f-log

just another web log

20 Aug 2018:
dali persistence of pie minus the pis
Surrealist progress on the Raspberry Pi HiRes project

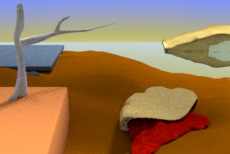
Never tried anything like this before in Blender but I am quite pleased with how well it is going. It is supposed to be a homage to Dali's Persistence of Memory.
Dali-esc landscape with an emptying pie ready for more pis

There are loads and loads of things that are wrong, or not quite right. But time is a factor so I am doing "best efforts" rather than spending a ridiculous amount of time perfecting it.

Are am still in two minds about adding a set of rough/glossy maps to the Pi main board. But to complete this image I will not be adding them now.
19 Aug 2018:
knifing the raspberry to get a bent lattice pi
Progress on the Raspberry Pi HiRes project

Lattice Modifier does not quite work like that. I need the Mesh to have enough Vertices to be deformed. So in the case of the main board I need some edges that go across, currently all of the triangles are length ways.

All I needed to do was add edge loops! CTRL+r ... nope not going to let me do that :(

First I tried a Remesh at oct tree 7. Mesh looked good but UV was gone. Manually re-adding the UV did not go perfectly and after some Island stretching and repositioning I gave up. It was not right and the mesh was super dense. The best way to resolve would have been to go to out tree 8 but this would have made the Mesh to dense to work with.

Then I tried creating a Plane, adding edge rings and removing all Faces so it looked like a wire multi-slicer. Then I used the Knife Project to slice through the board (making sure cut through was enabled) but this did not lend itself to lining up against the existing vertices and missed out the odd one on the side. I did mitigate that by tipping the mesh in Orthogonal view. The UV was preserved but not good enough.

Finally I tried the basic Knife tool with angle constraint and cut through enabled. Success! The Knife tool snaps to the existing vertices and with the Orthogonal view the straight lines went from one side to the other. No I just need to manually cut the board 20 times :(

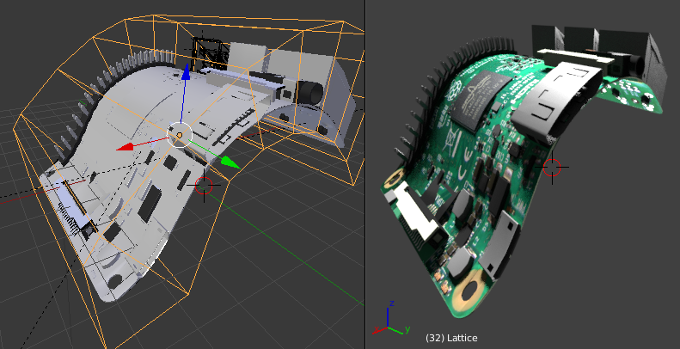
Subdivided up the chips a few times and added a Lattice. But this time I did not Join all my Mesh components together. Instead I selected them all and lastly selected the new Lattice, then CTRL+p to bring up the Parent menu and selected Lattice Deform. This created a Lattice Modifier for each and every Mesh using the same Lattice.

Looking good!
raspberry 3d model bent in Blender software

and because this the Lattice Modifier it is Non-Destructive. I can turn it off or change it at anytime!


17 Aug 2018:
bent pi floats non-manifold chips in the most delightful way
Slight Raspberry Pi HiRes project issue/s.

Now to check that there are no more Flat shaded Objects. Hmmm two remain, but I can not find them in the outliner??
bpy.data.objects.data.meshes
has two meshes that I can not find if I go through all objects with

for obj in bpy.data.objects:
        if obj.data :
            if obj.data.name[0:7] == "Cube.05" :
                print(obj.name, obj.data.name)

After a few hours convinced my code was bad I tried closing and re-opening Blender .. No Flat Meshes found, grrr! Never seen Blender commit such a foe par, still this was odd circumstances.

So I have applied the Modifiers, made everything Smooth and enabled Auto Smooth with the default 30°. As I did this piecemeal it did flag up some odd duplicates that I was able to remove.

All I need to do is CTRL+J join everything together...

Well that looks good! Let us try adding a very simple Lattice Modifier...

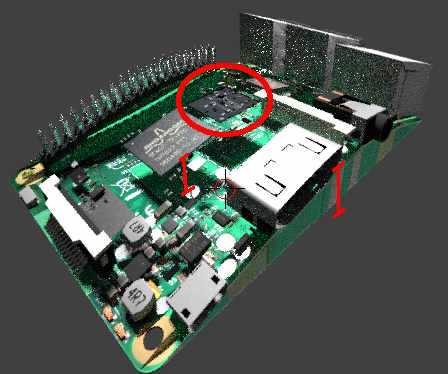
Wow! bends and ... oh! oh dear, something has gone a bit wrong.

blender render of raspberry pi model bent by lattice modifier with some obvious modelling issues highlighted

Highlighted there is the board not remaining a constant thickness, the main chip floating off and large number of other components doing a little dance.

I believe the issue is having not CTRL+A Applied all the Location, Scale and Rotation transformation. Easy fix once everything is a Mesh.

There is also the minor issue of cursory check showing a lot of Non-manifold geometry. Which is the scourge of the 3D world and basically boils down to Meshes not being water tight.

This is going to take a lot more work :(
15 Aug 2018:
auto smoothing experimentation causes disabling correct reporting
Roar Raspberry Pi HiRes project. The next stumble in trying to collate all the component Meshes and make a single MASTER MESH!

So it turns out that Plane.005 is in fact the Mesh that underlines the HDMI connector that is helpfully named hdmi connector...

But rather boringly Plane.005 and Plane,Plane.006,Plane.009,Plane.015 have the Auto Smooth set to 30° which is the default.

That is rather odd, because I found 86 that have the Auto Smooth set to 180°. I have verified this correct, 86 Objects that have a value set but is not enabled!

Judging by the spot check showing they are mostly Solder blobs I am guessing I duplicated one when I was experimenting with Auto Smooth. Obviously the default setting is just too good.

This may mean I can join everything then set it Smooth and add Auto Smooth, with the default 30° setting :)
15 Aug 2018:
attempted smooth attack with a blender pi
Moar Raspberry Pi HiRes project. The next step in trying to collate all the component Meshes and make a single MEGA MESH!

So we have applied all the Modifiers now we need to find all the Smooth/Flat shading and the Auto Smooth amounts.

Time for some coding
import bpy, math

def is_smooth(polys):
    smoothed=False
    for poly in polys:
        if not smoothed:
            smoothed = poly.use_smooth
    return smoothed

for mesh in bpy.data.objects.data.meshes:
    print(mesh.name, is_smooth(mesh.polygons), mesh.use_auto_smooth)
    print("{:8.4f}".format(math.degrees(mesh.auto_smooth_angle)) )


402 results of which 28 are Flat shaded.

The mesh.name is not the object.name, so it's Cube.721 etc :(

Still the Auto Smooth angle seems consistently at 180°

But something is up because the number of Meshes reported with Smooth Shading and Auto Smooth is just five.

Need to think on this a bit.
15 Aug 2018:
de-modifing the pi with outliner
Back to business, Pi business that is, Raspberry Pi HiRes project. The next step is to collate all the component Meshes and make a single MEGA MESH!

Small problem, when I last tried this the Object settings got mashed up and things that were Flat shaded were Smooth and vice versa. Not to mention the Modifiers being lost, like the USB Mirror Modifier leaving half a port.

First things first, how many components are we talking?
import bpy

scene = bpy.context.scene

obj_active = scene.objects.active
selection = bpy.context.selected_objects

for obj in selection:
    print(obj.name)


There are 13 main components, HDMI, USB etc and 183 smaller Meshes, resistors, capacitors etc.
(not going to list them all here)

Now I needed to get a list of all the Meshes with Modifiers and remove those modifiers.
code?

Hmmm, Python would be able to find them but I wonder if...

In the Blender Outliner panel you can search by name and if you search for "Modifiers" it handily finds all the Modifiers attached to Meshes and expands the tree to show them!

Spent an hour or so just going through each one (over 100) applying the modifier and making sure nothing breaks.
09 Aug 2018:
mitigated a sticky mouse situation under the sun
My mouse melted, again (scroll to the bottom)!

At least this time it was not the rubber spontaneously giving up the ghost but the glue holding the rubber. But considering the similarities I do wonder if it was the glue on the Microsoft mouse last time.

Here I have my Cooler Master CMSTORM Devastator, which I dearly love due to its design and the fact it fits in my massive hands. The place your thumb rests is a rubber mat and a few days ago it looked like its bleeding a sticky transparent substance.

This ick was not water soluble and I do not have any alcohol based cleaners. Had to peel off the rubber and the scrub with soap and hot water and then the glue still put up a fight. Once dried I just super-glued it back on. This morning I tested my handy work and it works perfectly.

Small confession. We are currently experiencing an unusual prolonged heatwave here in the UK and after trying a mixture of blinds closed, windows opened I opted for blinds wide open and windows wide opened. In the hope that some of the trapped hot air would get replaced. Technically it worked but the sun would have been bearing down on my desk and ... you guessed it my mouse.

How do I know? The side away from the window that has the same rubber pad was not affected. I wonder what the operating temperature of the glue is/was...
09 Aug 2018:
lucky rigid bucket settle for proxy pis
OK that did work well, though I would love an opportunity to re-shoot, the camera moves a bit too fast.

Here is the same montage but only showing the blocks that were physically calculated. Meaning it was real-time.

Montage of 10 frames of proxy block objects falling into a bin of Raspberry pis

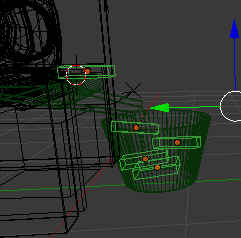
Here you can see that the Bucket, the Conveyor tray and the End roller are part of the physics simulation, all set as Passive. While the proxy Cube objects are spaced out over each other in the bucket.
Blender partial screenshot of the Rigid Body setup, Raspberry Pis falling off a conveyor belt

The Cubes in the bucket all settle out of the camera's view.

It was great when the Cube from the belt bounced around and ended up down the side of the Bucket. That was all pure luck!
06 Aug 2018:
fake pi real physics looks ok in miniature
That worked pretty well
Montage of 10 frames of a Raspberry pi 3d model falling into a bin of Raspberry pis

These frames were taken using the frame step set to 10, the samples set to 15 and the render size set to 25%. Because of the low settings they took about a minute each to render.

From that I could see the physics appears to work OK with each animated block being replaced by a Pi model.

Still got to wait until tomorrow to see the results, started rendering the 90 frames two days ago.

Once this is complete I can move on to the final must have pi renders, the Dali render. I have sketched it out but I have no idea how long it will take to model, to my specification.
04 Aug 2018:
blender physics cheat test in 5 4 3 2 1
OK so that is another FOUR seconds of video and it only took 5 days!

Next bit is a mix of pre-scripted animation and physics. The trick I will be trying out is to use the physics engine to animate some simple cubes then bake the animation and finally parent copies of the Raspberry Pi Hi-Res model to the basic cubes.

It will not match the contours of the Pi but I am confident it will not be obvious in the short clip. If necessary I can repeat the physics with more detailed meshes, think a flat cuboid with extrusions for the large USB/Ethernet ports.
loading results, please wait loading animateloading animateloading animate
[More tags]
rss feed

email

root

flog archives


Disclaimer: This page is by me for me, if you are not me then please be aware of the following
I am not responsible for anything that works or does not work including files and pages made available at www.jumpstation.co.uk I am also not responsible for any information(or what you or others do with it) available at www.jumpstation.co.uk In fact I'm not responsible for anything ever, so there!