f-log

just another web log

24 Oct 2013:
Is it a magazine or a book, just buy it
I hesitated from buying a £13 magazine but I am so glad I did buy raspberry pi for beginners in the end.

It is packed with high quality stuff, from basic setup to high altitude balloons to RASBMC. Each article is well written with lots of "and if you want to do this" tips.

Recommended, better than a number of more expensive Raspberry Pi books I have seen.
24 Oct 2013:
berryclip at home on my pi
The next soldering kit for the Pi is the berryclip. A six LED board with a switch and a speaker.

The kit came with a rubber foot that allows the entire board to sit neatly on top of the Pi, where it looks perfectly at home.

Following the instructions from the berryclip homepage was a breeze, just make a directory for the code to sit in, downloaded it and unpack it, job done.

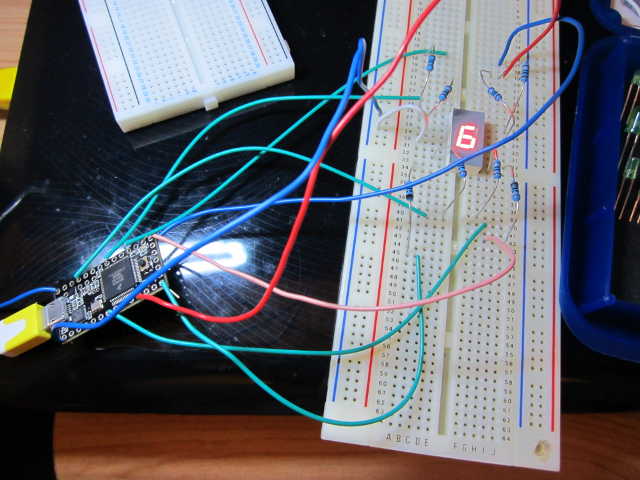
The berryclip code includes 12 python scripts. The first one simple turns on all the six LEDs in turn and this is where I meet my first problem, one of the LEDs was not lighting.

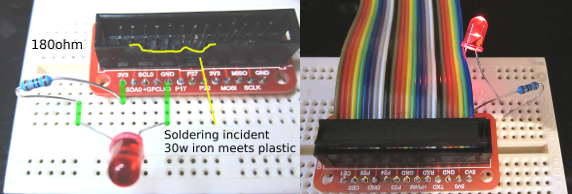
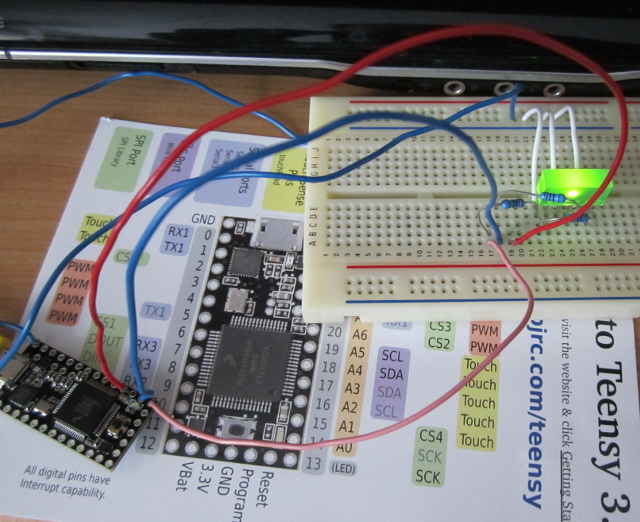
I had heard of LEDs shipping with the flat edge on the wrong side. So I whipped up my 3.3v 180Ω single LED circuit confirmed it worked with a spare LED and then connected the wires to the terminals of the problem LED on the board. It worked fine and on closer examination I could see an incomplete solder joint.

One quick solder job later and I had the LEDs all lit.

berryclip board installed on pi and running script 01

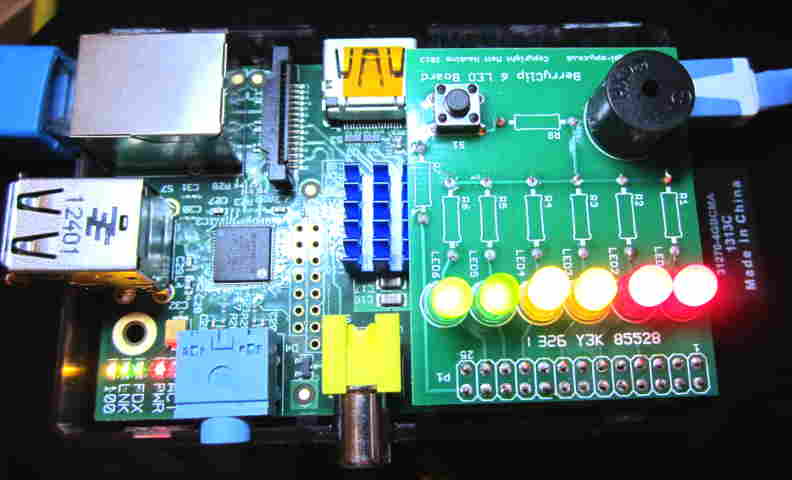
You may have noticed the lack of resistors on the board, that's because I soldered them on the other side <blush/>

The other 11 scripts were

02 Testing the speaker: beeps twice (VERY LOUD!).
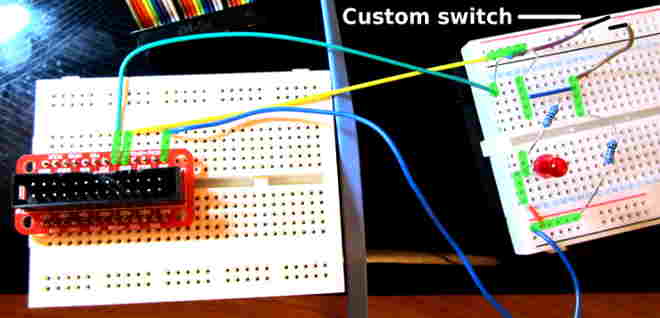
03 Testing the switch: reports when pressed.
04 Shows input and output: waits for the switch to be pressed the lights the LEDs.
05 All elements in use: when switch is pressed all LEDs and speaker operate.
06 LED sequence: bouncing left to right and back again infinitely.
07 Dice: 1-6 LEDs lit randomly each time the switch is pressed.
08 Reaction game: waits a random amount of time then turns off LEDs and the time you take to press the switch is measured.
09 Random: LEDs light randomly.
10 Light show: different animated sequences are shown using the LEDs.
11 Stop GO: changes state from Stop to GO when switch is pressed.
12 Morse code: Generates Morse beeps for the text you enter.

All in all the berryclip is an awesome mini kit and ideal for Raspberry Pi beginners.

To sum it up in one word, FUN!
22 Oct 2013:
MagPi vol2 circuit with a little cobbler
Pi cobbler

So what is a "breakout board"? Simply put it takes the pins from the Pi and makes them available on a "Breadboard", in other words, its a plug. A very useful plug!

After checking all my connections and re-soldering where necessary, I decided to try the simple circuit from the MagPi Issue 2(PDF). It is just a an LED with three resistors and a switch.

But, being a cautious chap when it comes to these electronics, I took my old favourite from the Teensy LED experiments, Adding a 180Ω resistor to the 3.3v Pin 1 and then a standard Red LED from that resistor to GND on Pin 9 and got the LED to light, just by having the Pi powered up.

Issue number one with the Pi Cobbler; the cable is at right angles and covers the aforementioned Pins. I might try and find a non right-angled cable. Note this is surmountable, just annoying. The other end fits easily over the GPIO pins with the cable not obscuring the Pi at all.

Raspberry Pi with cobbler running single LED with 180ohm resistor connected and unconnected

Now to create the lovely MagPi Issue 2(PDF) circuit I needed a switch. I did not have an actual momentary switch so I just used two wires and held them together to "complete" the circuit, worked fine.
Raspberry Pi with cobbler running the circuit from MagPi Issue 2, cobbler unconnected

The circuit has two functions, light the LED when the circuit is complete and trigger the input on P17(Pin 11). To use Python to talk/listen to the GPIO pins we need the RPi package. At writing the newest version was 0.5.3a, always check for the newest version.
wget https://pypi.python.org/packages/source/R/RPi.GPIO/RPi.GPIO-0.5.3a.tar.gz

tar xvf RPi.GPIO-0.5.3a.tar.gz
cd RPi.GPIO-0.5.3a/

sudo python setup.py install

source/py_gpio.c:23:20: fatal error: Python.h: No such file or directory
OK, that's pretty obviously a missing Python development environment.
sudo apt-get install python-dev
Reading package lists... Done
Building dependency tree    
Reading state information... Done
The following extra packages will be installed:
libexpat1-dev python2.7-dev
The following NEW packages will be installed:
libexpat1-dev python-dev python2.7-dev
0 upgraded, 3 newly installed, 0 to remove and 0 not upgraded.
Need to get 28.9 MB of archives.
After this operation, 36.0 MB of additional disk space will be used.
Do you want to continue [Y/n]?
Err http://mirrordirector.raspbian.org/raspbian/ wheezy/main python-dev all 2.7.3-4
404 Not Found
Get:1 http://mirrordirector.raspbian.org/raspbian/ wheezy/main libexpat1-dev armhf 2.1.0-1 [210 kB]
Get:2 http://mirrordirector.raspbian.org/raspbian/ wheezy/main python2.7-dev armhf 2.7.3-6 [28.7 MB]
Fetched 28.9 MB in 5min 16s (91.4 kB/s)                                        
Failed to fetch http://mirrordirector.raspbian.org/raspbian/pool/main/p/python-defaults/python-dev_2.7.3-4_all.deb 404 Not Found
E: Unable to fetch some archives, maybe run apt-get update or try with --fix-missing?

Oh, bit out of date.
sudo apt-get update
sudo apt-get upgrade

sudo apt-get install python-dev

Sometime later I was able to run

sudo python setup.py install

and write the code
#!/usr/bin/python
import time
import RPi.GPIO as GPIO
GPIO.setmode(GPIO.BOARD)
GPIO.setup(11, GPIO.IN)

while True:
    mybutton = GPIO.input(11)
    if mybutton == False:
        print "giggle"
        time.sleep(.2)

I called my file "gpio.py" so to run it I ran
sudo python gpio.py
If you exclude the sudo the code can not access the GPIO ports and you will get an error.
Now when ever I touched the wires together not only did the LED light but a message of "giggles" was displayed.

So the bottom line on the
Pi Cobbler? The alternative is to try and hook up the unmarked pins directly from the Pi one by one, not recommended, but of course the Pi Cobbler is recommended.
10 Oct 2013:
Soldering for the Raspberry Pi
I really thought I remembered the trick/s to soldering but, 10+ years addles the brain and it was only after a burnt finger and some non-conductive connections that I ended up reading the "Soldering is easy:How to do it"(pdf) comic.

It would seem I made two fatal mistakes; One: I thought the trick was to heat up the components for 5-6 seconds before applying solder, which half worked, but had the side affect of melting the plastic holding the pin and it falling through the board. Two: you need the most powerful soldering iron, turns out 30w is probably to powerful for micro electronics. After I had read the comic and switched to my old 12w things went much more smoothly.

What was I soldering?
The raspberry-pi cobbler a simple breakout connector for the GPIO pins to a bread board.
This was my first victim and as it has no components other than the connector and pins, I was able to screw it up and then make it usable. After burning my finger with the 30w iron and then heating a pin to the point it dropped through the board I finally managed to melt one side of the connector. Of the 26 pins 5 were not making an electrical connection from the pin on the board to the pin in the connector, but a bit of re-soldering fixed that.

Then there was the Berry Clip a neat package containing, 6x LEDs, 1 speaker and 1 button.
As my second victim, it benefited from the soldering iron power downgrade, but my inexperience still left some connections a bit lacking(solder). Still at first glance it appeared OK.

The most adventurous of my purchases was the Pi Matrix an awesome 64x LED display that sits directly on top of the PI(as does the Berry Clip).
After the practice of burning and melting the two previous boards this one came out the best. It had a lot of connections that required soldering and I made a point of not doing the almost duplicate number that are not necessary. The unnecessary soldering is to provide further breakout connections, so non PIs can interface with the board, which is a brilliant idea, but not for me.

So that little lot came in at less than £23 which is perfect for my limited budget.
08 Oct 2013:
Teensy powered 8 segment led display
I have the box below full of LEDs of various types from at least 2003 and once the kids saw it they demanded I get the "clock" to work.
box of LEDs including single, blocks and segmented blocks
The "clock" referred to the single block counting two eight segment LEDs. I really did not have enough resistors to attempt that, but I also wanted to get the big black eight segment working. So I touched the 5v from the teensy to each lead of the segment while Ground was connected to the middle pin that was slightly separated from the rest. Success! added a resistor to avoid pulling too much current and set to work wiring up my bread board with eight resistors and cabling it all to the Teensy.
And ... nothing. No LEDs lit at all. Investigation time.

Connected just the Teensy Pin 13 and ... no segments on the LED lit?! Checked wires connections, no luck. Then I repeated the original 5v wire and it worked. Oh, seems the digital pins on the Teensy are 3.3v, drat.

OK, so away went the giant display and out came the medium one, same issue, so away that went and now I am using a teensy (pun intended) one and all is well.

After getting it hooked up and testing the segments could be turned on and off I worked with my 7yr old to define; first the numeric characters '9','8','7','6','5','4','3','2','1','0' in a countdown. Then added an animated track like my heart beat project and finally my son wanted the LEDs to "dance" so he defined an order that they would flicker about.
an eight segment led showing a '6' on a bread board powered by a Teensy 3.0
Each wire from the Teensy is a digital pin set as output delivering 3.3v when set. Each of those wires are connected in series with their own 180Ω resister and each resistor connecting to a pin on the segment block, finally with the ground pin connected to the Teensy's ground.
Here is a YouTube video of it all working.

video
And here is the Arduino Sketch code, note how simple it is, just turning on and off pins.
// Teensy 3.0 has the LED on pin 13
const int ledPinSeg1DOT = 13;
const int ledPinSeg2 = 14;
const int ledPinSeg3 = 16;
const int ledPinSeg4 = 19;
const int ledPinSeg5 = 23;
const int ledPinSeg6 = 12;
const int ledPinSeg7 = 9;
const int ledPinSeg8 = 5;
int count=0;

// the setup() method runs once, when the sketch starts

void setup() {
// initialise the digital pin as an output.
pinMode(ledPinSeg1DOT, OUTPUT);
pinMode(ledPinSeg2, OUTPUT);
pinMode(ledPinSeg3, OUTPUT);
pinMode(ledPinSeg4, OUTPUT);
pinMode(ledPinSeg5, OUTPUT);
pinMode(ledPinSeg6, OUTPUT);
pinMode(ledPinSeg7, OUTPUT);
pinMode(ledPinSeg8, OUTPUT);
Serial.begin(38400);
Serial.println("Let us begin");
}

// the loop() method runs over and over again,
// as long as the board has power

void loop() {
///////////////////////// 9
//digitalWrite(ledPinSeg1DOT, HIGH); // set the LED on
digitalWrite(ledPinSeg2, HIGH); // set the LED on
digitalWrite(ledPinSeg3, HIGH); // set the LED on
digitalWrite(ledPinSeg4, HIGH); // set the LED on
//digitalWrite(ledPinSeg5, HIGH); // set the LED on
digitalWrite(ledPinSeg6, HIGH); // set the LED on
digitalWrite(ledPinSeg7, HIGH); // set the LED on
digitalWrite(ledPinSeg8, HIGH); // set the LED on
/////////////////////////
delay(500);
digitalWrite(ledPinSeg1DOT, LOW);    // set the LED off
digitalWrite(ledPinSeg2, LOW);    // set the LED off
digitalWrite(ledPinSeg3, LOW);    // set the LED off
digitalWrite(ledPinSeg4, LOW);    // set the LED off
digitalWrite(ledPinSeg5, LOW);    // set the LED off
digitalWrite(ledPinSeg6, LOW);    // set the LED off
digitalWrite(ledPinSeg7, LOW);    // set the LED off
digitalWrite(ledPinSeg8, LOW);    // set the LED off

//////////////////////// 8
//digitalWrite(ledPinSeg1DOT, HIGH); // set the LED on
digitalWrite(ledPinSeg2, HIGH); // set the LED on
digitalWrite(ledPinSeg3, HIGH); // set the LED on
digitalWrite(ledPinSeg4, HIGH); // set the LED on
digitalWrite(ledPinSeg5, HIGH); // set the LED on
digitalWrite(ledPinSeg6, HIGH); // set the LED on
digitalWrite(ledPinSeg7, HIGH); // set the LED on
digitalWrite(ledPinSeg8, HIGH); // set the LED on
////////////////////////
delay(500);
digitalWrite(ledPinSeg1DOT, LOW);    // set the LED off
digitalWrite(ledPinSeg2, LOW);    // set the LED off
digitalWrite(ledPinSeg3, LOW);    // set the LED off
digitalWrite(ledPinSeg4, LOW);    // set the LED off
digitalWrite(ledPinSeg5, LOW);    // set the LED off
digitalWrite(ledPinSeg6, LOW);    // set the LED off
digitalWrite(ledPinSeg7, LOW);    // set the LED off
digitalWrite(ledPinSeg8, LOW);    // set the LED off

//////////////////////// 7
//digitalWrite(ledPinSeg1DOT, HIGH); // set the LED on
digitalWrite(ledPinSeg2, HIGH); // set the LED on
digitalWrite(ledPinSeg3, HIGH); // set the LED on
//digitalWrite(ledPinSeg4, HIGH); // set the LED on
//digitalWrite(ledPinSeg5, HIGH); // set the LED on
//digitalWrite(ledPinSeg6, HIGH); // set the LED on
digitalWrite(ledPinSeg7, HIGH); // set the LED on
digitalWrite(ledPinSeg8, HIGH); // set the LED on
////////////////////////
delay(500);
digitalWrite(ledPinSeg1DOT, LOW);    // set the LED off
digitalWrite(ledPinSeg2, LOW);    // set the LED off
digitalWrite(ledPinSeg3, LOW);    // set the LED off
digitalWrite(ledPinSeg4, LOW);    // set the LED off
digitalWrite(ledPinSeg5, LOW);    // set the LED off
digitalWrite(ledPinSeg6, LOW);    // set the LED off
digitalWrite(ledPinSeg7, LOW);    // set the LED off
digitalWrite(ledPinSeg8, LOW);    // set the LED off

//////////////////////// 6
//digitalWrite(ledPinSeg1DOT, HIGH); // set the LED on
digitalWrite(ledPinSeg2, HIGH); // set the LED on
digitalWrite(ledPinSeg3, HIGH); // set the LED on
digitalWrite(ledPinSeg4, HIGH); // set the LED on
digitalWrite(ledPinSeg5, HIGH); // set the LED on
digitalWrite(ledPinSeg6, HIGH); // set the LED on
//digitalWrite(ledPinSeg7, HIGH); // set the LED on
digitalWrite(ledPinSeg8, HIGH); // set the LED on
////////////////////////
delay(500);
digitalWrite(ledPinSeg1DOT, LOW);    // set the LED off
digitalWrite(ledPinSeg2, LOW);    // set the LED off
digitalWrite(ledPinSeg3, LOW);    // set the LED off
digitalWrite(ledPinSeg4, LOW);    // set the LED off
digitalWrite(ledPinSeg5, LOW);    // set the LED off
digitalWrite(ledPinSeg6, LOW);    // set the LED off
digitalWrite(ledPinSeg7, LOW);    // set the LED off
digitalWrite(ledPinSeg8, LOW);    // set the LED off

//////////////////////// 5
//digitalWrite(ledPinSeg1DOT, HIGH); // set the LED on
digitalWrite(ledPinSeg2, HIGH); // set the LED on
digitalWrite(ledPinSeg3, HIGH); // set the LED on
digitalWrite(ledPinSeg4, HIGH); // set the LED on
//digitalWrite(ledPinSeg5, HIGH); // set the LED on
digitalWrite(ledPinSeg6, HIGH); // set the LED on
//digitalWrite(ledPinSeg7, HIGH); // set the LED on
digitalWrite(ledPinSeg8, HIGH); // set the LED on
////////////////////////
delay(500);
digitalWrite(ledPinSeg1DOT, LOW);    // set the LED off
digitalWrite(ledPinSeg2, LOW);    // set the LED off
digitalWrite(ledPinSeg3, LOW);    // set the LED off
digitalWrite(ledPinSeg4, LOW);    // set the LED off
digitalWrite(ledPinSeg5, LOW);    // set the LED off
digitalWrite(ledPinSeg6, LOW);    // set the LED off
digitalWrite(ledPinSeg7, LOW);    // set the LED off
digitalWrite(ledPinSeg8, LOW);    // set the LED off

//////////////////////// 4
//digitalWrite(ledPinSeg1DOT, HIGH); // set the LED on
//digitalWrite(ledPinSeg2, HIGH); // set the LED on
digitalWrite(ledPinSeg3, HIGH); // set the LED on
digitalWrite(ledPinSeg4, HIGH); // set the LED on
//digitalWrite(ledPinSeg5, HIGH); // set the LED on
//digitalWrite(ledPinSeg6, HIGH); // set the LED on
digitalWrite(ledPinSeg7, HIGH); // set the LED on
digitalWrite(ledPinSeg8, HIGH); // set the LED on
////////////////////////
delay(500);
digitalWrite(ledPinSeg1DOT, LOW);    // set the LED off
digitalWrite(ledPinSeg2, LOW);    // set the LED off
digitalWrite(ledPinSeg3, LOW);    // set the LED off
digitalWrite(ledPinSeg4, LOW);    // set the LED off
digitalWrite(ledPinSeg5, LOW);    // set the LED off
digitalWrite(ledPinSeg6, LOW);    // set the LED off
digitalWrite(ledPinSeg7, LOW);    // set the LED off
digitalWrite(ledPinSeg8, LOW);    // set the LED off

//////////////////////// 3
//digitalWrite(ledPinSeg1DOT, HIGH); // set the LED on
digitalWrite(ledPinSeg2, HIGH); // set the LED on
//digitalWrite(ledPinSeg3, HIGH); // set the LED on
digitalWrite(ledPinSeg4, HIGH); // set the LED on
//digitalWrite(ledPinSeg5, HIGH); // set the LED on
digitalWrite(ledPinSeg6, HIGH); // set the LED on
digitalWrite(ledPinSeg7, HIGH); // set the LED on
digitalWrite(ledPinSeg8, HIGH); // set the LED on
////////////////////////
delay(500);
digitalWrite(ledPinSeg1DOT, LOW);    // set the LED off
digitalWrite(ledPinSeg2, LOW);    // set the LED off
digitalWrite(ledPinSeg3, LOW);    // set the LED off
digitalWrite(ledPinSeg4, LOW);    // set the LED off
digitalWrite(ledPinSeg5, LOW);    // set the LED off
digitalWrite(ledPinSeg6, LOW);    // set the LED off
digitalWrite(ledPinSeg7, LOW);    // set the LED off
digitalWrite(ledPinSeg8, LOW);    // set the LED off

//////////////////////// 2
//digitalWrite(ledPinSeg1DOT, HIGH); // set the LED on
digitalWrite(ledPinSeg2, HIGH); // set the LED on
//digitalWrite(ledPinSeg3, HIGH); // set the LED on
digitalWrite(ledPinSeg4, HIGH); // set the LED on
digitalWrite(ledPinSeg5, HIGH); // set the LED on
digitalWrite(ledPinSeg6, HIGH); // set the LED on
digitalWrite(ledPinSeg7, HIGH); // set the LED on
//digitalWrite(ledPinSeg8, HIGH); // set the LED on
////////////////////////
delay(500);
digitalWrite(ledPinSeg1DOT, LOW);    // set the LED off
digitalWrite(ledPinSeg2, LOW);    // set the LED off
digitalWrite(ledPinSeg3, LOW);    // set the LED off
digitalWrite(ledPinSeg4, LOW);    // set the LED off
digitalWrite(ledPinSeg5, LOW);    // set the LED off
digitalWrite(ledPinSeg6, LOW);    // set the LED off
digitalWrite(ledPinSeg7, LOW);    // set the LED off
digitalWrite(ledPinSeg8, LOW);    // set the LED off

//////////////////////// 1
//digitalWrite(ledPinSeg1DOT, HIGH); // set the LED on
//digitalWrite(ledPinSeg2, HIGH); // set the LED on
//digitalWrite(ledPinSeg3, HIGH); // set the LED on
//digitalWrite(ledPinSeg4, HIGH); // set the LED on
//digitalWrite(ledPinSeg5, HIGH); // set the LED on
//digitalWrite(ledPinSeg6, HIGH); // set the LED on
digitalWrite(ledPinSeg7, HIGH); // set the LED on
digitalWrite(ledPinSeg8, HIGH); // set the LED on
////////////////////////
delay(500);
digitalWrite(ledPinSeg1DOT, LOW);    // set the LED off
digitalWrite(ledPinSeg2, LOW);    // set the LED off
digitalWrite(ledPinSeg3, LOW);    // set the LED off
digitalWrite(ledPinSeg4, LOW);    // set the LED off
digitalWrite(ledPinSeg5, LOW);    // set the LED off
digitalWrite(ledPinSeg6, LOW);    // set the LED off
digitalWrite(ledPinSeg7, LOW);    // set the LED off
digitalWrite(ledPinSeg8, LOW);    // set the LED off

//////////////////////// 0
//digitalWrite(ledPinSeg1DOT, HIGH); // set the LED on
digitalWrite(ledPinSeg2, HIGH); // set the LED on
digitalWrite(ledPinSeg3, HIGH); // set the LED on
//digitalWrite(ledPinSeg4, HIGH); // set the LED on
digitalWrite(ledPinSeg5, HIGH); // set the LED on
digitalWrite(ledPinSeg6, HIGH); // set the LED on
digitalWrite(ledPinSeg7, HIGH); // set the LED on
digitalWrite(ledPinSeg8, HIGH); // set the LED on
////////////////////////
delay(500);
digitalWrite(ledPinSeg1DOT, LOW);    // set the LED off
digitalWrite(ledPinSeg2, LOW);    // set the LED off
digitalWrite(ledPinSeg3, LOW);    // set the LED off
digitalWrite(ledPinSeg4, LOW);    // set the LED off
digitalWrite(ledPinSeg5, LOW);    // set the LED off
digitalWrite(ledPinSeg6, LOW);    // set the LED off
digitalWrite(ledPinSeg7, LOW);    // set the LED off
digitalWrite(ledPinSeg8, LOW);    // set the LED off
//////////////////////// .
digitalWrite(ledPinSeg1DOT, HIGH); // set the LED on
//digitalWrite(ledPinSeg2, HIGH); // set the LED on
//digitalWrite(ledPinSeg3, HIGH); // set the LED on
//digitalWrite(ledPinSeg4, HIGH); // set the LED on
//digitalWrite(ledPinSeg5, HIGH); // set the LED on
//digitalWrite(ledPinSeg6, HIGH); // set the LED on
//digitalWrite(ledPinSeg7, HIGH); // set the LED on
//digitalWrite(ledPinSeg8, HIGH); // set the LED on
////////////////////////

delay(2500);

// Track animation
for (int i=0;i<10;i++) {
    digitalWrite(ledPinSeg5, HIGH); // set the LED on
    delay(100);
    digitalWrite(ledPinSeg5, LOW);    // set the LED off
    digitalWrite(ledPinSeg3, HIGH); // set the LED on
    delay(100);
    digitalWrite(ledPinSeg3, LOW);    // set the LED off
    digitalWrite(ledPinSeg2, HIGH); // set the LED on
    delay(100);
    digitalWrite(ledPinSeg2, LOW);    // set the LED off
    digitalWrite(ledPinSeg7, HIGH); // set the LED on
    delay(100);
    digitalWrite(ledPinSeg7, LOW);    // set the LED off
    digitalWrite(ledPinSeg8, HIGH); // set the LED on
    delay(100);
    digitalWrite(ledPinSeg8, LOW);    // set the LED off
    digitalWrite(ledPinSeg6, HIGH); // set the LED on
    delay(100);
    digitalWrite(ledPinSeg6, LOW);    // set the LED off
}

digitalWrite(ledPinSeg4, HIGH); // set the LED on
delay(100);
digitalWrite(ledPinSeg4, LOW);    // set the LED off

// "Dance" animation
for (int i=0;i<15;i++) {
    digitalWrite(ledPinSeg2, HIGH); // set the LED on
    delay(100);
    digitalWrite(ledPinSeg2, LOW);    // set the LED off
    digitalWrite(ledPinSeg4, HIGH); // set the LED on
    delay(100);
    digitalWrite(ledPinSeg4, LOW);    // set the LED off
    digitalWrite(ledPinSeg6, HIGH); // set the LED on
    delay(100);
    digitalWrite(ledPinSeg6, LOW);    // set the LED off
    digitalWrite(ledPinSeg3, HIGH); // set the LED on
    delay(100);
    digitalWrite(ledPinSeg3, LOW);    // set the LED off
    digitalWrite(ledPinSeg8, HIGH); // set the LED on
    delay(100);
    digitalWrite(ledPinSeg8, LOW);    // set the LED off
    digitalWrite(ledPinSeg7, HIGH); // set the LED on
    delay(100);
    digitalWrite(ledPinSeg7, LOW);    // set the LED off
    digitalWrite(ledPinSeg5, HIGH); // set the LED on
    delay(100);
    digitalWrite(ledPinSeg5, LOW);    // set the LED off
}
delay(2500);
count++;
Serial.println(count,DEC);
}

06 Oct 2013:
Teensy 3.0 LED basics
Many MANY years ago I did work with circuit boards, LEDs, Ohms law etc at college. From what I remembered, circuits had to be properly set to get exacting volts, amps, watts. Not something an uneducated hobbyist could ever hope to do without a lot of time, patience and math.
So I thought it would be for me and the Teensy if I could not calculate the exact resistor values then nothing would work.

I found some notes regarding powering LEDs from 5v sources that a 200-300ohm resistor was all that was needed, no need to be exact and then I came across this...

The Sylvia Show (Episode 3 Arduino) a YouTube channel featuring a young hackerette. This particular episode was looking at what you can do with the Arduino and shows a LED powered with NO RESISTORS! Shock Horror!

Turns out that LEDs will source all the current available and fail if the current draw is too high (that would be bad) but that at the low digital pin output voltages of 3.3-5v of an Arduino/Teensy that current pull is not so high as to cause and explosion but instead would light the LED (although brighter than "normal").
Another nice thing is if you put the LED in the wrong way around you do not permanently damage it, it just does not light and the circuit is not complete. Diodes (the D in LED) only allow current to flow in one direction.

This little girl got me to try this on my Teensy and it works, just connect the GND to the cathode and pin 13 to the anode and the LED flashes along with the LED on the Teensy (no code required).

After finding some 180Ohm resistors I tried hooking up a block of three LEDs. In this photo the short white leads are connecting each LED's cathode to Ground and each resistor connects to the anodes.
Teensy 3.0 power three LEDs
The wires are connected to the Teensy by just bending them and hoping they do not fall off. I REALLY should have ordered the Teensy 3.0 with Pins.

// Teensy 3.0 has the LED on pin 13
const int ledPin1 = 13;
const int ledPin2 = 14;
const int ledPin3 = 15;

// the setup() method runs once, when the sketch starts

void setup() {
// initialise the digital pins as an output.
pinMode(ledPin1, OUTPUT);
pinMode(ledPin2, OUTPUT);
pinMode(ledPin3, OUTPUT);
Serial.begin(38400);
Serial.println("Pins initialised");
}

// the loop() method runs over and over again,
// as long as the board has power

void loop() {
digitalWrite(ledPin1, HIGH); // set the LED on
delay(200);                
digitalWrite(ledPin1, LOW);    // set the LED off

digitalWrite(ledPin2, HIGH); // set the LED on
delay(200);                
digitalWrite(ledPin2, LOW);    // set the LED off

digitalWrite(ledPin3, HIGH); // set the LED on
delay(200);                
digitalWrite(ledPin3, LOW);    // set the LED off

digitalWrite(ledPin2, HIGH); // set the LED on
delay(200);                
digitalWrite(ledPin2, LOW);    // set the LED off
Serial.println("Repeating sequence");
}

Made the LEDs turn on and off in sequence creating a cylon/KITT animation.
The kids were suitably impressed with this but demanded more, so I swapped out the 3xLED block for a Red, an Orange and a Green LED and changed the code to produce a traffic light sequence including the Red+Orange when the lights are about to go Green.
// Teensy 3.0 has the LED on pin 13
const int RedLedPin = 13;
const int OrangeLedPin = 14;
const int GreenLedPin = 15;

// the setup() method runs once, when the sketch starts

void setup() {
// initialise the digital pins as an output.
pinMode(RedLedPin, OUTPUT);
pinMode(OrangeLedPin, OUTPUT);
pinMode(GreenLedPin, OUTPUT);
Serial.begin(38400);
Serial.println("Pins initialised");
}

// the loop() method runs over and over again,
// as long as the board has power

void loop() {
digitalWrite(RedLedPin, HIGH); // set the LED on
delay(4000);                
digitalWrite(OrangeLedPin, HIGH); // set the LED on
delay(500);
digitalWrite(OrangeLedPin, LOW);    // set the LED off
digitalWrite(GreenLedPin, HIGH); // set the LED on
delay(4000);                
digitalWrite(GreenLedPin, LOW);    // set the LED off
digitalWrite(OrangeLedPin, HIGH); // set the LED on
delay(500);
digitalWrite(OrangeLedPin, LOW);    // set the LED off
Serial.println("Repeat sequence");
}


Amazing how easy this is!
loading results, please wait loading animateloading animateloading animate
[More tags]
rss feed

email

root

flog archives


Disclaimer:
This page is by me for me, if you are not me then please be aware of the following
I am not responsible for anything that works or does not work including files and pages made available at www.jumpstation.co.uk I am also not responsible for any information(or what you or others do with it) available at www.jumpstation.co.uk
In fact I'm not responsible for anything ever, so there!

[Pay4Foss banner long]