f-log

just another web log

29 May 2014:
Hating jquery is overrated
So do I really hate jQuery? No, but I see no reason to unnecessarily burden the user with it as a requirement.

First up the html5eyeball cutout example uses jQuery. My 2048 investigations use jQuery and so on...

For the html5eyeball project I deliberately removed the jQuery requirement from the core code so that like the cutout example you can easily plumb it back in. Of course you can easily use other libraries or just go pure JavaScript.

What does the plumbing look like?
    $(window).mousemove(function (event) {
        eb1.doDraw(event.pageX, event.pageY);
        eb2.doDraw(event.pageX, event.pageY);
    });

That updates the two eyeballs by calling their respective "doDraw" methods as the mouse is moved.
clicking the eyeballs requires

    $('#eyeball1').click(function (){
        eb1.setPupil();
    });
    $('#eyeball2').click(function (){
        eb2.setPupil();
    });

where "eb1" and "eb2" are the JavaScript objects created as "eyeballs" and "#eyeball1"/"#eyeball2" are the html objects that hold the "eyeballs".
Such as

    var eb1 = new Eyeball("eyeball1");
    eb1.init();
    var eb2 = new Eyeball("eyeball2");
    eb2.init();


To allow the JavaScript to make "new" instances I made Eyeball a function and then everything in it a member of that.

function Eyeball(elementId) {
    var eyeball = this;
    eyeball.targetId = elementId;

this constructor makes a context called "eyeball" that everything is attached. Excluding objects that are private.
Example of a public function

// Convert degrees to radians
eyeball.deg2Rad = function(degrees) {
    return degrees * Math.PI / 180;
};

Example of private objects that the caller can not interfere with accidentally.

    var isDrawing=false;
    var animatedPupilScale = 0.0;
    var pupilAnimationIntervalId = 0;

The "eyeball" context exists in the creations of the "Eyeball" object but not to the functions themselves, where we must revert to "this".

// return random value between 0 and 1.0
eyeball.getRandom = function() {
    return Math.random();
};

// return random float value between min and max (including min and up to but not including the whole number max)
eyeball.getRandomRange = function(min,max) {
    return min + ( max * this.getRandom());
};

There are just two more posts due in this series. The magic of offsets and then a complete run down of all the settings.
28 May 2014:
html5eyeball highlights the highlights
I know this is dragging out, but I want to get my moneys worth the for the amount of time I have spent on the html5eyeball project.

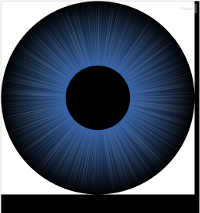
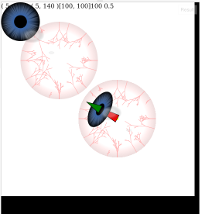
Today is the turn of the highlights. Not very exciting but comparing the eyeball with and without them is a huge difference.
iris no highlights
JSFiddle
iris with highlights
JSFiddle

Two things make the highlights special. Firstly they do not move so appear to come from an external source and secondly they are carefully blended to only lighten colours underneath.

The lightening is not readily obvious when compared with just rendering a lighter object above the. But this subtly does make the experience more realistic.

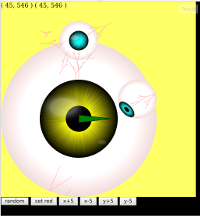
You can control the the highlights.
eyeball.highlight1 = {'x':.35, 'y':.35, 'width':.16, 'height':.1, 'colour1' : {'red':200,'green':200,'blue':200, 'alpha' : 0.4}, 'colour2' : {'red':0,'green':0,'blue':0, 'alpha' : 0.0}};
eyeball.highlight2 = {'x':.64, 'y':.64, 'width':.04, 'height':.02, 'colour1' : {'red':200,'green':200,'blue':200, 'alpha' : 0.2}, 'colour2' : {'red':0,'green':0,'blue':0, 'alpha' : 0.3}};

That is setting the first highlight to be a red-ish halo with a green centre and the second with yellow outer and transparent inner.

Note the x, y, width, height values are in percentage points of the size of the eyeball.
eyeball scaling is number one

That is it for the visual elements but there is more in our journey. Next up is why I hate JQuery and how the JavaScript got packaged.
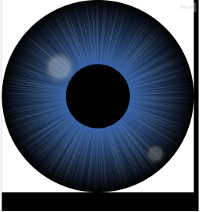
28 May 2014:
tie up your pupil in an iris
The iris and pupil where joined as one for the majority of the html5eyeball project. One of my favourite features of the original sliballs incarnation was that the user could click the eyeball and as well as the iris changing colour the pupil would expand suddenly then slowly contract. This was to simulate sudden exposure to light and always catches people unaware.

large computer generated iris with pupil and highlights
JSFiddle

To make this happen I had to decouple the pupil from the iris. As the pupil was just a filled circle there was no point creating a separate layer for it.

eyeball layers showing the lack of integrated pupil
JSFiddle

It was then a simple matter to create an entry point that the controlling JavaScript could call.
eyeball.setPupil({'red':255,'green':0,'blue':0});
Will set the iris red. If no parameters are passed to setPupil then a random colour from the irisColours array is used.
eyeball.irisColours = [{'red':0,'green':255,'blue':0},{'red':255,'green':255,'blue':0},{'red':0,'green':255,'blue':255}];
These are example colours, it is not limited to three.

If the setting animatePupil is true(the default) when setPupil() is called then the pupil is doubled in size and at 30 frames per second contracts back to its normal size.

This iris is incredibly simple. Just an array of coloured lines projecting from the centre. What gives the iris its luminosity is that each line has a random point where it fades to the colour set as eyeball.irisOuterColour. The main colour can also be supplied as eyeball.irisInternalColour

It is worth pointing out that real irises are "draw string bags" that tighten to constrict over the pupil.
http://twistedsifter.com/2012/08/extreme-close-ups-of-the-human-eye/
http://www.dailymail.co.uk/sciencetech/article-2246888/The-eyes-The-iris-pictured-remarkable-incredible-close-shots.html

So that must be it for the html5eyeball project? No yet, next it is the highlight of the highlights.
25 May 2014:
Lightning strikes a cord with veins in the html5 eyeball
As mentioned before one of the key areas I wanted to improve upon with the html5eyeball project was the veins.

The pre-drawn veins in sliballs bugged me for two reasons. 1) that with everything else being dynamic and XAML-ly they we "cheap" and out of place. 2) I SHOULD be able to design a system to generate them dynamically.

The approach was to use recursion. Something I had needed for my Professor Layton Mono C# Peg Solitaire solver. Recursion can be summarised as a distributed state machine and the easiest example is walking a file system. Start in the root folder and check for folders and files, if there are files process them if there are folders add them to the "Need to be looked at" queue. As soon all the files in the current folder are processed look at any folders in the queue and start the process all over again. For the Professor Layton Mono C# Peg Solitaire solver the state was not folders but board layouts with additional possible moves.

For the veins it was about branching. Each branch would create a stalk and then if permitted split in two and each branch would follow the same rules. This is very easy to visualise but took me quite sometime with various tweaks to get anywhere near what I was looking for.

Here I prove the concept with hard coded values.
basic single level recursion with hard coded values
JSFiddle

That would not scale I need to plot my branch forks with angles. I needed to understand rotation.
canvas rotation
JSFiddle

and point projection
multiple spokes from a single point via only and angle and length
JSFiddle

Now in my recursive function I could split the branch via random angles and just pass the new angle and a random length to the recursive function, could split the branch via random angles and just pass the new angle and a random length to the recursive function, could split the branch via random angles and just pass the new angle and a random length to the recursive function.

But I could not allow the recursive function to run forever. There is a famous fable about a payment requested from a king. The king is asked to only pay one (either grain of rice or gold coin, depending on which version you read) and to double that amount until a chess board has been filled. A chess board having 8x8 spaces is 64 increments.

In the first space is one item, in the second two, in the third four and so on.

1, 2, 4, 8, 16, 32, 64, 128, 256, 512, 1024, 2048, 4096 etc

that's just thirteen places, at the 64th the value is 9,223,372,036,854,775,807, that's a big scary number.

If I let my lightning algorithm run for more than 10 levels then the computer slows down, a lot. My ideal value seems to be about 5.
lightning recursion at 5 levels
JSFiddle

There was also the small problem of making my nice inverted lightning appear in a circle, like an eyeball.
many recursively drawn veins in a circle
JSFiddle

Initially I tried to create a "fade" in the centre to allow for long veins. But after tweaking the algorithm I am happy with random possibilities.
testing fading options in canvas drawing
JSFiddle

The very last piece of the vein puzzle was to make the area the veins occupied large enough it could be scrolled around as the eyeball "looked" around.
Details of the canvas layer composition that masked out unwanted veins can be found here.
demonstration of vein masking
JSFiddle (excessive veins are used to show up the procedure).

There are surprisingly more posts to be made in this series. Next time the iris and pupil take centre stage.

25 May 2014:
non linear circular scaling for a better eyeball
To get the iris to appear correctly we have to first move to the new point, then rotate the opposite way we want to point scale horizontally and finally rotate to reverse angle.
These clock faces demonstrate the procedure.
four clock faces at different scaling and rotations as part of the process

So that's it, job done? Not quite. With linear scaling where the amount the iris is scaled horizontally(in step 3.) is directly proportional to the location on the eyeball. That is that at the side of the eyeball the iris is fully scaled and at the centre of the eye it has no scaling, with the half way point having exactly 50% of the scaling found at the edge. Seems logical enough and is the process that the sliballs used. But it has the tendency to break the illusion the more you see the eyeballs 'looking' in different directions. At first glance everything appears correct but then it becomes clear that the iris is a flat object 'sliding' about the surface of the eye.

To combat this I needed a different kind of scaling. I tried a number of well known curves, such as sine and exponential but they did not produce the affect I wanted. I basically wanted a circular curve...
First I tried to get my head around the plotting of circles and arcs that make up circles. Most drawing libraries/frameworks abstract the math away from the developer but I needed to control them. the math in the end is quite simple(in length) plot a point with sin and cos by passing in a radian of the angle you are interested in.
function drawSemicircle(cx, cy, r, startAngle, endAngle, increment, style)
{
    var x = 0;
    var y = 0;
    for (a=startAngle; a <= endAngle; a += increment) {
        x = r * Math.cos(deg2Rad(a)) + cx;
        y = r * Math.sin(deg2Rad(a)) + cy;
        plotPoint(x, y, 4, style);
    }
}

Where cx, cy are the pixel locations of the centre of your semi-circle and r is the radius from the centre.
plotting a semi-circle in standard pixel address space
JSFiddle

Job done? No, I need that semi-circle to plotted in a virtual address space ranging from 0.0(no scaling) to 1.0(100% scaled). Then I can pass in my linear iris movement and receive my circular plotted scaling value.
plotting of a semi-circle on a 0.0-1.0 graph
JSFiddle

// plots n as x on a semi circle and returns the y
// n cannot be outside the range 0.0 - 1.0 or the fabric of space maybe imperceptibly altered.
function circ(n) {
    var angle90 = Math.PI / 2;
    var radius = 1;
    var y = radius * Math.sin(angle90 * n);
    return y;
};

Note the lack of the 'cos' Math function as the input, 'n' provides that value.

Now as the iris travels from the centre of the eyeball to the edge the scaling takes place as a sort of "acceleration curve". This produces a much more realistic appearance that tricks the views eye.

It is worth pointing out (as I did on the sliballs page) that if the 'iris' circle was instead a rectangle, then the illusion would just not work. The viewer would need the corners furthest away from the centre of the eye to be closer together due to perspective than the corners closest to the centre. Indicating they were closer to the viewer or further away.

In next post in the series we will investigate the lightning generation that makes up the random vein patterns.
24 May 2014:
the importance of eyeball canvas layering
So one of the biggest hurdles with the html5eyeball project was layering. In Silverlight the vector based entities you design in XAML remain layered entities and you can move them to your hearts content. But with the html5 canvas each element is rendered to the canvas. For want of a better analogy, the paint is stuck to the canvas and loses any object nature it may have started with. As well as being a pain for me this allows some truly amazing pixel manipulation.

I need to take my nicely composed eyeball a break it out into its constituent parts.
eyeball in layers

This was not too difficult. I changed the drawing code to always pass in the destination canvas and then created separate canvases and passed them to the different drawing routines. Then instead of having to pre-define all these canvases in the DOM I set about creating them dynamically in the target DIV you initiate the eyeball with.

The by changing the hideRenderLayers setting to false eyeball.hideRenderLayers = false;
you can see the layers making up the eyeball.

There are five canvas layers 'canvasMain', 'canvasBackground', 'canvasVeins', 'canvasIris' and 'canvasHighlights'.

'canvasMain' is the container canvas holding everything else.
'canvasBackground' is gradient sphere describing the ball of the eyeball.
'canvasVeins' moves laterally as you move the mouse, masked in a circle so the veins do not appear outside the eyeball.
'canvasIris' get scaled and moved to provide the fake 'looking' effect. Also holds the pupil that maybe animating.
'canvasHighlights' uses a special blending technique that means the highlights only make areas underneath light. This produces the nice glass effect.

The layers stay hidden on the page(ignoring the hideRenderLayers setting) until they are needed at which point I copy the 'canvasBackground' onto the 'canvasMain'. This gives a cue ball like result, then the 'canvasVeins' are layered in after being adjusted to the mouse position. This is then masked off by a circle that hides any veins that would appear off the edge of the eyeball.
large vein layer being masked
The 'canvasIris' is then scaled and translated(moved) and rendered. Finally the 'canvasHighlights' with the magic     context.globalCompositeOperation = 'lighter';
completes the affect.

In next post in the series I will briefly describe the 'circle' scaling method I developed and why it makes such a big difference.
23 May 2014:
eyeball scaling is number one
This is the second post in a series regarding the html5eyeball project.

There were two elements of the Silverlight sliballs project that really bugged me.

The first one was simply that the eyeball was a fixed size. Every element in the XAML code had hard coded values defining the size and location of visual elements. Perhaps more annoying is the knowledge that if I had just taken a slightly different approach that would not have been an issue. But fear not, it is one of the main features in the the new html5eyeball project. You can literally supply the source div at any size, the only limitation will be your computers ability to render it.
jsfiddle screen shot of eyeballs with different sizes

The second was the veins. Although vector based, I had hand drawn/positioned them and they would appear identical every time the eyeball was rendered. In the html5eyeball project the veins are drawn with a recursive branching algorithm that initially looked like lightning.
jsfiddle screen shot of the lighting experiments

It is quick and easy to enter specific size values for an object to make sure it is working and then get into a the trap of adding each new element manually setting the size values based on the working parent. Worse, the longer you follow this path the harder it is to revert to any kind of scaling model.

Looking at the code I tried to base all values off the target DIV. The only parameter that you *must* supply in the JavaScript to add an eyeball is the DIV you want the eyeball to live in. The code then adds all the eyeball layers to that DIV. This DIV should have a width and height, the code then treats these values as 100% for everything else. You can then override specific settings, such as the highlights size and location or the pupil diameter via JavaScript.

e.g.
    eyeball.travel = 1.0;
    eyeball.pupilScale = 1.0;
    eyeball.highlight1 = {"x":.35, "y":.35, "width":.16, "height":.1, "colour1" : {"red":200, "green":200, "blue":200, "alpha" : 0.4}, "colour2" : {"red":0, "green":0, "blue":0, "alpha" : 0.0}};
    eyeball.highlight2 = {"x":.64, "y":.64, "width":.04, "height":.02, "colour1" : {"red":200, "green":200, "blue":200, "alpha" : 0.2}, "colour2" : {"red":0, "green":0, "blue":0, "alpha" : 0.3}};


These default values show the highlights not positioned by pixel but by a decimal from 0.0 to 1.0 (which equates to 0%-100%).

In next post in the series we will move onto layering system that was instrumental in the allowing the iris and veins to follow the mouse.

22 May 2014:
birth of the html5eyeball project
Back in 2009 I decide to take my interest in SilverLight up a notch. All my previous work had focused on the functionality and very little on the design. I had seen some amazing vector based application done in Flash and I was eager to try something myself.

I cannot remember why I choose eyeballs but that was the project I went with. The project turned out pretty well, and I garnered some small fame. No body else at the time was creating such an app and it caught even non developers interest.

Fast forward a few years to 2012 and I was looking at some amazing demos using html5 canvas. As it is also vector based I decided to try and replicate the old sliballs experience. I knocked up a few basic demos for the iris creation that gave me the basics of Canvas drawing and then promptly forgot about the whole thing. About six months later I went looking for the project to resurrect it only to find really really old code that did not seem to have functionality I had previously added. It turned out that a) the file naming was confusing and b) I had used css to turn off most of the visuals. Finally having found the code I started work again but this time I had the power of Jsfiddle on my side.

It is difficult to portray just how instrumental JSFiddle has been in my ability to pursue the html5eyeball project. For starters it meant I could have a full development environment at work that I drop in and out of when a free moment presented itself. This then translated to development at home on my linux machine all with full backups and the freedom to fork the code to try different ideas and develop features.

In a series of blog/f-log posts I hope to take you on my journey on how and why the html5eyeball came about.
22 May 2014:
github project html5eyeball with demo
Been busy creating another Github project
https://github.com/robgithub/html5eyeball
There is even a hosted example to play with at
http://robgithub.github.io/html5eyeball/examples/cutout.html

loading results, please wait loading animateloading animateloading animate
[More tags]
rss feed

email

root

flog archives


Disclaimer: This page is by me for me, if you are not me then please be aware of the following
I am not responsible for anything that works or does not work including files and pages made available at www.jumpstation.co.uk I am also not responsible for any information(or what you or others do with it) available at www.jumpstation.co.uk In fact I'm not responsible for anything ever, so there!

[Pay4Foss banner long]