f-log

just another web log

24 Mar 2014:
Windows 8.1 did not eat my hamster
Asked to build a new computer for someone and they wanted Windows 8.1 on it.

Built all the components and apart from the PSU connectors not being compatible with the Motherboard(Needed an extra 8 pin connector called the ATX_12) it all went together rather easily.

Next job install Windows 8.1. Insert CD, Windows flag comes up go an do something else, come back computer is dead and will not turn on. Disconnect power, reconnect and try again. The logo comes up wait a while and ... power goes off, no warnings no messages just *PLK* no power. Check motherboard connections and BIOS heat information all fine. Disconnect Hard drive, same result, move RAM slots same result. Run MemTest86 and no problems.

At this point,

The only thing left is the Graphics card AMD Sapphire 5450, but I need that because the Motherboard [Gigabyte GA-F2A55-DS3 (rev. 3.0)] only has HDMI out. Its a pain but I manage to borrow an HDMI telly and remove the GFX card. Now the Windows 8.1 installation goes all the way through to the first reboot but then turns off and will not come back on (in the same way).

I have not got any Windows 7 install media but I do have Windows XP ... Hours later after it formatted the 500GB hard disk it rebooted and shortly powered off.

Its not heat, not RAM, not Power, not HDD(but I might have to confirm that with a Linux USB boot disk and not Windows 8.1.

The replacement PSU was from an old machine but it did have all the required connectors and was 530W. Unfortunately it had been kept in a garage. so I started looking at ways to convert the new PSU that was missing the 8 pin connector to work and I came across a number of threads detailing that it did fit, just on one side. Had fun disconnecting everything yet again, rebuilt it with the new PSU attached and...

It is only bloody working! Well, I mean it has got further than any time previously.

Now to avoid logging in with a Microsoft account (Windows 8.1 is very pushy), click the "Create a New Account" link. Yes, I know you do not want to create an account, bare with me. At the bottom of the sign up form is another link "Sign in without a Microsoft Account". Then, finally you can create a regular account.

Sometime later, at some point Windows convinced the owner to sign up a Microsoft account and the computer is linked.

20 Mar 2014:
Umbraco on 1and1 shared hosting
Someone wanted a easy to use CMS based website (that I would be building) so I suggested Umbraco. It is what we use at work and although Windows based and open source is very powerful and extendable. In fact it is the only CMS system I have ever seen that correctly balances easy of use for content editors and control to programmers.

As my host is 1and1(linux) I recommend the 1and1 Windows package.

Step one was to prepare the Microsoft SQL Server database. 1and1 have a queuing process for this so make a sandwich. Once completed make a note of the Server, Database, Username and Password.

Step two was to download Umbraco and I here was where I hit my first road block. Version 7 has been released but states it is not compatible with any hosting environment other than "Full Trust". I downloaded it and tried installing it via the 1and1 webfiles tool, it did not work. Deleted that and downloaded 6.1.6. This time things went much more smoothly. Just upload the zip file and use the unzip option to install the files.

Step three needs to be to set the new Umbraco folder as an application (option in webfiles).

Try and access the new site but got
The configuration section 'scriptResourceHandler' cannot be read because it is missing a section declaration
This was fixed by downloading the web.config via the ftp server and adding
<sectionGroup name="system.web.extensions" type="System.Web.Configuration.SystemWebExtensionsSectionGroup, System.Web.Extensions, Version=4.0.0.0, Culture=neutral, PublicKeyToken=31bf3856ad364e35">
     <sectionGroup name="scripting" type="System.Web.Configuration.ScriptingSectionGroup, System.Web.Extensions, Version=4.0.0.0, Culture=neutral, PublicKeyToken=31bf3856ad364e35">
        <section name="scriptResourceHandler" type="System.Web.Configuration.ScriptingScriptResourceHandlerSection, System.Web.Extensions, Version=4.0.0.0, Culture=neutral, PublicKeyToken=31bf3856ad364e35" requirePermission="false" allowDefinition="MachineToApplication"/>
        <sectionGroup name="webServices" type="System.Web.Configuration.ScriptingWebServicesSectionGroup, System.Web.Extensions, Version=4.0.0.0, Culture=neutral, PublicKeyToken=31bf3856ad364e35">
         <section name="jsonSerialization" type="System.Web.Configuration.ScriptingJsonSerializationSection, System.Web.Extensions, Version=4.0.0.0, Culture=neutral, PublicKeyToken=31bf3856ad364e35" requirePermission="false" allowDefinition="Everywhere"/>
         <section name="profileService" type="System.Web.Configuration.ScriptingProfileServiceSection, System.Web.Extensions, Version=4.0.0.0, Culture=neutral, PublicKeyToken=31bf3856ad364e35" requirePermission="false" allowDefinition="MachineToApplication"/>
         <section name="authenticationService" type="System.Web.Configuration.ScriptingAuthenticationServiceSection, System.Web.Extensions, Version=4.0.0.0, Culture=neutral, PublicKeyToken=31bf3856ad364e35" requirePermission="false" allowDefinition="MachineToApplication"/>
         <section name="roleService" type="System.Web.Configuration.ScriptingRoleServiceSection, System.Web.Extensions, Version=4.0.0.0, Culture=neutral, PublicKeyToken=31bf3856ad364e35" requirePermission="false" allowDefinition="MachineToApplication"/>
        </sectionGroup>
     </sectionGroup>
    </sectionGroup>

into the <configSections> at the top of the file.
Then remove the <httpProtocol>...</httpProtocol> section.

If you get other errors make sure (and then make sure again) that the Umbraco folder is an application.

Upload and overwrite the web.config and hit the new site/umbraco and you should get the installation screen.

Enter all the SQL server settings from earlier and watch out, some setting look the same but are subtly different.

The last but one part of the installer tries to download some starter kits but fails due to security and you just have to wait for it to timeout. Also the "Continue" button would not work for me once it had failed to get the starter kits, but by the time I have tried to create a ticket reporting the issue it was working again and I could get into the Umbraco backend.

Once Umbraco is installed make a backup of the web.config.

Note that this 1and1 package was running on iis7.5 .net 4.5 but in the "classic pipeline" mode so no extension-less URLs. 1and1 stated that a) they were surprised it was 7.5 and not 6 and b) there was no option to change the pipeline as it would affect all sites on that shared host :(
20 Mar 2014:
End of an painful car audio era
It is the end of an era...

For the last four+ years I have been trying to listen to podcasts during my daily commute. It started with MP3 CDs and these scripts to split and to burn them.
#!/bin/bash
# check file audio file for being greater than 80 mins and halfing it
file=$1
#4440 seconds = 74mins
max=4440
mins=$((`soxi $file -D | sed -e "s/\..*//"`))
echo "file $file $mins"
if [ $mins -gt $max ]; then
    echo "SPLITTING"
    half=$((`soxi $file -s `/2))
    sox $file --show-progress -r 44100 -c 2 $(basename "$file" .wav)_part1.wav trim 0s $(($half))s
    sox $file --show-progress -r 44100 -c 2 $(basename "$file" .wav)_part2.wav trim $(($half))s
    rm $file
    ls $(basename "$file" .wav)*
fi

cdrecord dev=4,0,0 -blank=fast
cdrecord dev=4,0,0 -pad -audio tnew.wav

(that includes blanking a RW CD)

Then, after changing cars I started to use a MP3 player I have had since 2001. It has a jaded history but it's one claim to fame is that it comes with 0MB storage, you have to plug a USB key in. Minor problem number one: it does not recognise drives over 512MB and most of mine are 1GB or bigger. Problem number two: it is very fussy not recognising many drives. Problem number three: it does not remember where you are in a track, if you turn it off, only the track number itself is remembered, very bad news if you stop 50mins into a 1 hour podcast, the fast forward is painfully slow. Minor problem number four: no AUX port in the car. Minor problem number five: you never know when you are listening to the last podcast, meaning you could have nothing to listen to for most of your journey. Bonus problem: sound fades in at the beginning of each track but only when there is sound. Bonus problem number two: Uses a single AA battery that when you remove all the memory is lost.

Solution number one: ended up with two donated 128MB drives. Solution number two: formatted in such a way as they would be recognised, did not work with other drives. Solution number three: bash script below that splits the tracks into 5min chunks. Solution number four: buy a radio transmitter and tune the car radio to the correct frequency. Solution number five: add spoken "n of total" sample to beginning of each track. Bonus solution: started with generating a beep and pre-pending it to each 5min chunk, but progressed on to the spoken sample. Bonus solution number two: have steady stream of USBCELL AA batteries charged and ready to swap daily, it did give you a 5 second window to replace batteries(but has now died).
#!/bin/bash
#podcast loading
#split into 5 mins chunks
#Now with spoken intro detailing number of track and total tracks
./mp3splt -t 5.0 *.mp3
if [ $(find . -iname "*__*" | wc -c) -eq 0 ]; then
    echo "found NO processed files"
    exit
fi
#delete originals
find . -iname "*.mp3" -size +7M -type f -exec rm {} \;
#pad into padding folder
for i in *.mp3; do sox "$i" "padded/$i" pad 2 0;echo -n .; done;echo ""
#delete unpadded
rm *.mp3
#wrap with starter intro speech
cd padded
# get total number of files
total=$(ls | wc -l)
for f in $( ls ) ;do
    # get number of file
    index=$(ls | grep -nh $f | grep -o "^[0-9]*")
    echo $index of $total
    # create speech file
    espeak -w out.wav "playing $index of $total"
    # convert to mp3
    sox out.wav out.mp3
    #attach it to the front
    mp3wrap ../$f out.mp3 $f
done
cd ..
rm padded/*
echo "======================================================================="
echo "move the mp3 files to your device and remember to sync;umount ... ;sync"

I freely admit that is not "good" code but it has worked for many years. I needed to run it every 4-5 days with new podcasts.

But now I have not only an AUX port but also a USB port and I can use any size key! Next job is to alter the file names to note "n of total" that will then scroll on the radio display.
19 Mar 2014:
Stepper motor python twins and the Raspberry Pi
Time for another stepper motor.

It was too good and opportunity to pass up, at just over £3 I was willing to fail at getting both motors working on the Raspberry Pi

After some careful cable splicing I was ready to try it out. The previous wiring had involved a costly purchase of a set of 8 female to male wires, costing more than the motor. This time I cut up and old floppy disk drive connector and using a small chock-block and some inventive twisting was able to use existing wires.
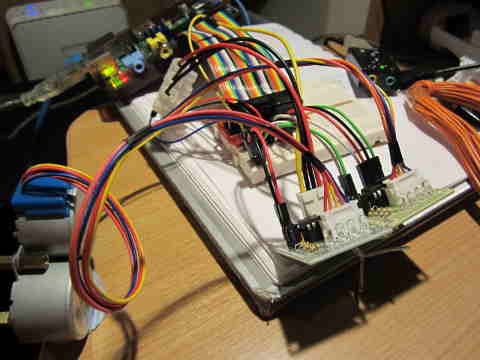
Boards and wires connecting two stepper motors to a Raspberry Pi

The biggest problem was going to be if the Pi could power both motors ...

First I identified which extra pins I could use from the Pi Cobbler. I found a large image detailing the GPIO pins 1000x471. The original setup had used 7,8,25,24 which was the first three miss one for ground and then the last one. So I continued down the line with 23(miss one for another ground), 18,15,14. Yes, the numbering convention IS confusing!

Test1: I copied the step.py code from last time and did nothing but change the GPIO pin definitions and ...

It did not work! I got
RuntimeWarning: This channel is already in use, continuing anyway. Use GPIO.setwarnings(False) to disable warnings.
GPIO.setup(pin,GPIO.OUT)


The excellent raspberrypi stackexchange led me to some 'clean up' code.
GPIO.cleanup()
Which strangely did not help until I had rebooted. But now the second motor did work as expected, for safety the first motor had had the power removed.

Test2: Reworked the python script to accept the number of steps and direction of each motor, mainly by duplicating blocks of code and Hey Presto! it works. Each motor can be run in an independent direction for an independent number of steps.
# Name: Steptwo.py
#
# Author: Rob Davis
# Based on the Stepper Motor code from matt.hawkins www.raspberrypi-spy.co.uk/2012/07/stepper-motor-control-in-python/
#
# Created: 2014/03/12
#
# Takes parameters for number of steps and which direction for each motor from the command line.
# e.g.
# sudo python step.py 4100 CCW 2050 CW
# To operate motor 1 for 4100 steps (a complete revolution) in a counter clockwise direction and at the same time turn motor 2 in a Clockwise direct for 2050 steps (180 degrees).
#-----------------------------------

#!/usr/bin/env python

# Import required libraries
import sys
import time
import RPi.GPIO as GPIO

# Use BCM GPIO references
# instead of physical pin numbers
GPIO.setmode(GPIO.BCM)

# Define GPIO signals to use
# GPIO24,GPIO25,GPIO8,GPIO7
StepPins1 = [24,25,8,7] # CW rotation
if (sys.argv[2]=="CCW") :
StepPins1 = [7,8,25,24] # CCW rotation
StepPins2 = [14,15,18,23] # CW rotation
if (sys.argv[4]=="CCW") :
StepPins2 = [23,18,15,14] # CCW rotation

# Set all pins as output
for pin in StepPins1:
# print "Setup pins"
GPIO.setup(pin,GPIO.OUT)
GPIO.output(pin, False)
for pin in StepPins2:
# print "Setup pins"
GPIO.setup(pin,GPIO.OUT)
GPIO.output(pin, False)

# Define some settings
StepCounter = 0
WaitTime = 0.01

# Define simple sequence
StepCount1 = 4
Seq1 = []
Seq1 = range(0, StepCount1)
Seq1[0] = [1,0,0,0]
Seq1[1] = [0,1,0,0]
Seq1[2] = [0,0,1,0]
Seq1[3] = [0,0,0,1]

# Define advanced sequence
# as shown in manufacturers datasheet
StepCount2 = 8
Seq2 = []
Seq2 = range(0, StepCount2)
Seq2[0] = [1,0,0,0]
Seq2[1] = [1,1,0,0]
Seq2[2] = [0,1,0,0]
Seq2[3] = [0,1,1,0]
Seq2[4] = [0,0,1,0]
Seq2[5] = [0,0,1,1]
Seq2[6] = [0,0,0,1]
Seq2[7] = [1,0,0,1]

# Choose a sequence to use
Seq = Seq1
StepCount = StepCount1
Seq = Seq2
StepCount = StepCount2

# Start main loop
steps1 = int(sys.argv[1])
steps2 = int(sys.argv[3])
stepc = 0
while (stepc<=steps1) or (stepc<=steps2):
if (stepc<=steps1):
    print "Step %i of %i" %(stepc,steps1)
if (stepc<=steps2):
    print "Step %i of %i" %(stepc,steps2)

for pin in range(0, 4):
    if (stepc<=steps1):
     xpin1 = StepPins1[pin]
     if Seq[StepCounter][pin]!=0:
     # print " Step %i Enable %i" %(StepCounter,xpin1)
        GPIO.output(xpin1, True)
     else:
        GPIO.output(xpin1, False)
    if (stepc<=steps2):
     xpin2 = StepPins2[pin]
     if Seq[StepCounter][pin]!=0:
     # print " Step %i Enable %i" %(StepCounter,xpin2)
        GPIO.output(xpin2, True)
     else:
        GPIO.output(xpin2, False)

StepCounter += 1

# If we reach the end of the sequence
# start again
if (StepCounter==StepCount):
    StepCounter = 0
if (StepCounter<0):
    StepCounter = StepCount

# Wait before moving on
time.sleep(WaitTime)
stepc+=1

GPIO.cleanup()


Now what to do with them? and can I afford a third/forth? and could the Pi power that many?

side note: the fixing of the two motors together is done with a couple of motherboard risers, remember those?
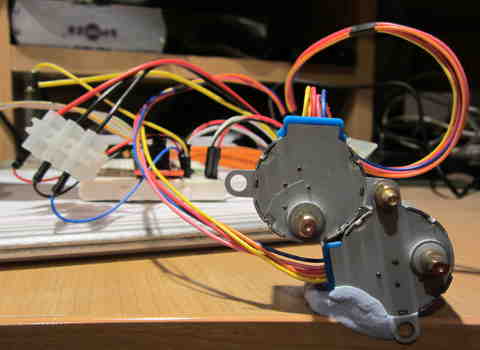
Two stepper motors attached with motherboard risers
loading results, please wait loading animateloading animateloading animate
[More tags]
rss feed

email

root

flog archives


Disclaimer:
This page is by me for me, if you are not me then please be aware of the following
I am not responsible for anything that works or does not work including files and pages made available at www.jumpstation.co.uk I am also not responsible for any information(or what you or others do with it) available at www.jumpstation.co.uk
In fact I'm not responsible for anything ever, so there!

[Pay4Foss banner long]