f-log

just another web log

30 Mar 2018:
spoof pi video sequence breakdown
My slightly delayed Raspberry Pi Model b(not+) spoof video is now live

All the video work was done in Blender From the initial renders of the different components to all the wipes and text animation.

The component shots highlighted some modelling issues. Mostly from grouping all the separate parts together and the tendency to inherit each others settings.

But I also had to re-shoot most scenes after finding something wrong. From the focus point to the speed/timing. Each short render took hours at 1920x1080, I need an upgrade.

screenshot of blender VSE showing sequence layout for raspberry pi spoof video

In the partial screen shot from Blender VSE (Video Sequence Editor) you can see a number of things.

The pink squares are the Cross Fades, in and out. Each has a corresponding Black colour for the fade to aim from/to.

The blue squares are the pre-rendered videos of Raspberry Pi components loaded into the sequencer.

The stack of yellowed blocks topped with two white blocks are how I did the text appearing and disappearing above the spinning Pi. All the text blocks are defined and positioned at the top of the screen but one of those White colour blocks is masking that from view. The second is placed directly above the Pi and is where the text is animated to.

To get the White colour blocks the right size and location you have to set the Strip Input Image Offset and Image Crop. Then the Y location of the Text blocks can be animated with key frames by hovering over the Y input field and pressing I. Animating from the top mask into the space between the two masks and then to the bottom mask and out of sight.

I tried to animate the scale of the white title text on the pinky background but the results were very choppy. In the end I created a new Scene in Blender and brought the resulting animation in to the two Meta strips. There was a 3rd Scene created for the credits and is the last green block in the VSE screenshot.

Finally, when publishing I tried something I have never tried before with YouTube, I enabled comments on the video. Perhaps not too surprisingly, a comment was added to the video in just a few minutes asking if I wanted to be friends. I think not.
30 Mar 2018:
old blender video spoof
It is finally done, or as "done" as it will ever be.

Raspberry Pi model 3 b(not +) spoof launch video


Raspberry Pi model 3 b+ official launch video


I originally wanted to add a silly sound track but this is all taking waaayy too long.

In the next post I will go into some of the details of using Blender to create the video
26 Mar 2018:
the slow glass man
Got the laptop running Blender under Ubuntu 16.04.4 but it has only 2GB RAM and is very slow.

5hrs to create this at 1920x1080

Blender render of a glass figure on a hexagon base

It is just a few blocks and circle set to 6 sides with and Array modifier. To be fair I have increased the samples to 800 and the Glossy and Transmission counts to 12.

If my main computer ever finishes rendering all the main Raspberry Pi animations I want then I will try the same .blend file and see how long it takes.

Rather annoyingly, I keep finding issues with the Raspberry Pi model now it is a in a single group. From smoothing inconsistencies to bizarre component offsets. Might be an easy fix, apply Location/Rotation/Scale
25 Mar 2018:
HP Pavilion dv9000 treated to a new ubuntu life via dd
The Windows laptop I was using for the TL-WR841N v12 is not a pretty sight. There are keys missing, cracked hinge(risky to open and close), not to mention the Vista install.

The owner had declared it ewaste so I thought I would Linux ise it and see if it was worth keeping around.

It is only 32bit (how old!) so I had to do some digging to find a Linux ISO. The Ubuntu (alternate) downloads page required a lot of scrolling to find.
Ubuntu 16.04.4 LTS (Xenial Xerus) which is from April 2016 but still supported and this version is dates Feb 2018.

Downloaded the ISO and ran it through unetbootin, which I have used in the past without issue. But the HP Pavilion dv9000 kept reporting
isolinux.bin is missing or corrupt

and fails to boot.

I tried repartitioning the USB drive a few times with different partition types, to no avail.

Then I happened upon Gentoo live USB guide that had the instructions to use
dd if=/home/user/src/ubuntu-16.04.4-desktop-i386.iso of=/dev/sdd bs=4M
where /dev/sdd is your USB drive, always double check this value before continuing, as it is often different in different machines.

That finished and after some odd errors that I did not quite have time to read it booted !
24 Mar 2018:
FCC and TP Link conspire to create ewaste TL-WR841N v12
When I convinced work to upgrade to a Ubiquiti Wi-Fi access point, it obsoleted the (very cheap) TP-LINK Wi-Fi router they had been using.

I kept this and decided it would be smart to flash it to DD-WRT with some known settings for emergency use. To be fair, I stole this idea off another company that, when our company first experienced Wi-Fi issues, lent us a flashed router setup for testing.
The TL-WR841N(D) v12 worked fine for two/three clients but when a forth and fifth were added, became more and more unstable.

This video was great start to get to v8 but the "Other downloads" link to get a newer version resulted in no results :(

DD-WRT router database search

But on the Supported Devices wiki I found reference to
tl-wr841ndv12
build 31825
20170406
for version 12


This lead to back to Other downloads
Downloads betas 2017 04-06-2017-r31825 tplink_tl-wr841ndv12
https://www.dd-wrt.com/site/support/other-downloads?path=betas%2F2017%2F04-06-2017-r31825%2Ftplink_tl-wr841ndv12%2F

which is just a round about way of getting to the files

This page mirrored most of the video's instructions

So I download the two files
factory-to-ddwrt.bin
tl-wr841nd-webflash.bin


avoiding the ones with "US" in the file name.

Then I booted up a Windows Vista laptop I had been given a couple of weeks ago and copied the files across.

Then I plugged a LAN cable in to Port 1 on the TL-WR841N and powered it up. Once it was up I plugged the other end into the laptop.

Drat! Issue. The router was NOT previously set up as DHCP so the laptop is not being given and IP address.

I think I have the access details including the last IP address in a note somewhere ...

OK, configured network, Firefox and in.
System Tools - Firmware - add file and...

ERROR 18005
Upgrade unsuccessful because the version the version of the upgraded file was incorrect. Please check file name

Double drat!

Error 18005 = locked firmware

TP Link lock down firmware as part of FCC requirements

Using TFTP *might* have worked but there was enough confusion on the forums that I will consider this router e-waste.

what a waste!
23 Mar 2018:
pi plus update video for pi plus plus update
Stuff has been happening. I wanted to have something finished to share but that is not going to happen anytime soon so I am blogging this update.

The HiRes Raspberry Pi project is still my main focus, but ...

The Raspberry Pi Foundation have released a new Raspberry Pi 3 Model B+

and they have a cool launch video which I took a shine to.

I did imagine recreating the video with my Blender rendered old Raspberry Pi 3 Model B that night. After all how hard could it be?

Turns out quite hard or, more to the point, time consuming.

This still is from the turning sequence that lasts for just 10 seconds. At 1920x1080 that took 30+ hours to render.
Raspberry Pi 3 Model B 3D model upended rendered in Blender

Close ups for the individual components with a high Depth Of Field are taking hours and hours to do just a few seconds :(

But I did get to test the Blender VSE effects and know how to create the text animations.

Just before that announcement, I had spent a few hours just going through the model tidying up bits. To my horror I found I had missed off two solder pads from the board texture and one whole component!

This was after I played with Freestyle in Blender to get a nice comic line rendering which revealed some odd geometry problems. This image was edited to remove them.

Raspberry Pi 3 Model B 3D model rendered in Blender with a comic style

The Ethernet and two USB ports both had strange lines down the middle. The lines were where the Mirror modifier had be set. Applying the modifier did not fix the problem.

When using non Freestyle rendering, even really close up there was no issue. In the end I found the Mirror modifier was not doing a good job of Merging and Clipping. By setting the Merge limit to 0.1005 the problem was solved.

I also spent time during the clean up to try and name all the components.

Current plan:

Finish recreating the Pi 3 B+ video
(not sure what to do with it when done, the moment has passed)
Create a cool Blueprint, did investigations on options weeks ago, test looked really cool.
Add all my existing videos together and the cool stills
Create a Dali melting Pi image (animation?)
Create a conveyor belt animation adding components to the Pi
Create a animation of multiple Pis falling into a pile.

Those last three were always in the plan and had been envisioned before most of the model was complete.
03 Mar 2018:
pi cluster super computer woh ha ha
I always find Christmas challenging when asked what I want. I do keep my Amazon wish list topped up with 200+ items, which is great for little things. But for special items I am not very good.

This/last year I did a bit of research and settled on the 
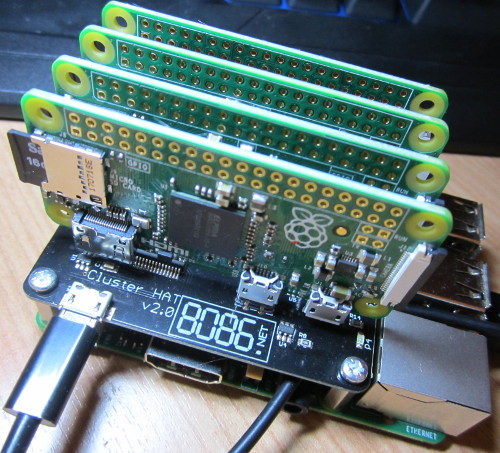
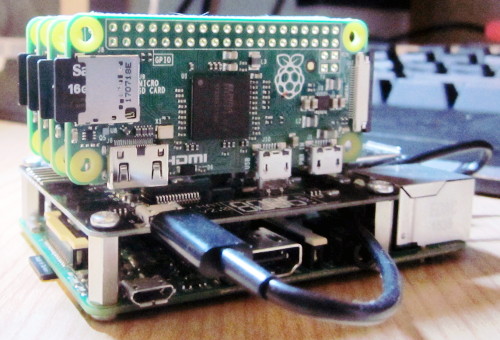
Raspberry Pi Cluster Hat v2 inclusive. Great it comes with 4x Raspberry Pi Zeros! Not so great Out Of Stock :(

But you could buy the Raspberry Pi Cluster Hat v2 board on its own. OK, "add to basket" then add the Pi Zeros and the SD cards and "Order rejected"?!?

Turns out Pi Zeros are Still restricted to one per customer, grrr.

So I ordered one from pimoroni.com, one from thepihut.com and a kit from ModMyPi.com an another from ModMyPi.com.

All came in plenty of time for Christmas and then Christmas came and went and I examined all the pieces but never got around to putting it together.

Until a week before my super illness when I watched all the Videos and actually built the thing. I even burnt all the SD Cards, but then got ill and forgot about it.

Now I am Back Baby!

Cluster Hat V2 assembled
Cluster Hat V2 assembled showing the 5 SD cards connected

Before I go any further the video is for the V1 and the USB power port has moved now in the V2.

Although there is this video using no SD cards for the Pi Zeros I wanted to first get the basic setup working. I had bought all those SD cards, after all.

Had to download the Master image and the Slave image. I could have downloaded one image per Pi, ending up with 5 image files, but instead I opted to manually modify the slave images.

Once the slave image was written to each SD card I had to mount it and update the cmdline.txt, just tweaking Pi Zero identifier.

" quiet init=/sbin/reconfig-clusterhat p1"
changing the p1 to p2, p3 ,p4 one for each Pi Zero.

Also enabled ssh for each card
touch ssh

Both those changes are on the vfat boot partition so you could make the change on almost any computer.

The Pi Zeros are powered by the Cluster Hat and the Cluster Hat is powered by the Raspberry Pi 3, that in turn, it powered by an official Raspberry Pi Foundation power supply.

Plugged in a USB keyboard and HDMI monitor and booted up ...

There are no instructions but I noticed the commands used in the videos

clusterhat on p1
the first Pi on the Cluster Hat powered up, then I did the same with the 3 other Pis (you can just run
clusterhat on
to get them all to turn in one go)

now what? Strangely I cannot find any documentation on what to do next, but there was something in the videos about networking.

ifconfig only shows ipv6 addresses and I know nothing about ipv6. Tried to ping the ipv6 address and ping did not like it. But I know ping does support ipv6 as it has options for it so I am doing something wrong :(

Found a note on one of the videos that DHCP might be required. plugged in ethernet and rebooted.

Cool now can I ping(when up) p1.local, p2.local etc
the resolved ip addresses are directly from my local sub-net DHCP.

but I want to do this off the grid, so I try again with no network, reboot, ping works(p1.local, p2.local etc) and get
169.254. addresses
that look random
169.254.102.163
169.254.116.199
169.254.114.226
169.254.156.34


If I take down the Pis with clusterhat off then on again, they have the same ip addresses. reboot whole Cluster Hat and still get the same weird ip addresses.
OK that's networking down, though I have never come across this .local stuff before ...

Next step, make all the machines accept key less ssh connections.
ssh-keygen
Ran directly on the Master Pi (no parameters)

ssh-copy-id pi@p1.local
enter password:


now I can
ssh pi@p1.local
and get no password prompt

repeat for p2,p3,p4

FYI I wanted a short password and the passwd command was giving me lip about lack of complexity and length, fix was
sudo passwd
also did not ask for current password.

now what ???

It is a mini self contained Pi network. Need to think on this.
01 Mar 2018:
I can have it made in solid gold
It is worth pointing out that yesterdays 3D print from https://www.shapeways.com was only available in Black HP Nylon Plastic presumably due to the thin walls and was about 3x the price of the cheapest plastics.

Now I have been back and and adjusted the size, just about all the hundreds of other materials are available, including solid Gold. But really, the cheapo plastic option is now selectable and is about the same price as the original Black HP Nylon Plastic, presumably due to the thicker walls.

I might have another go ...

I have wanted to try for many years, so I created this construction hard hat. The idea being, it would only take a few minutes to construct, because it is such a simple shape.

loading results, please wait loading animateloading animateloading animate
[More tags]
rss feed

email

root

flog archives


Disclaimer: This page is by me for me, if you are not me then please be aware of the following
I am not responsible for anything that works or does not work including files and pages made available at www.jumpstation.co.uk I am also not responsible for any information(or what you or others do with it) available at www.jumpstation.co.uk In fact I'm not responsible for anything ever, so there!