I like automation so I wanted to try Gcalcli as command line way of entering appointments that would appear on my phone and I could see in Linux
It has Gentoo package, easy life ! NOPE installed fine but got error
ERROR: Missing module - No module named gflags
Install from PIP as per instructions NOPE
error: oauth2client 1.4.12 is installed but oauth2client<5.0.0dev,>=1.5.0 is required by set(['google-api-python-client'])
manually install specific dependencies NOPE
keep saying the same thing about versions even though each one had been downloaded from their respective source and was the newest.
Connect to Google account NOPE
Opened up a browser (ouch), forced me to log in to Google (ouch) then, after enabling the support ... it just sat there, tried multiple times.
Manually set up account YES
This involved copying and pasting the specially formatted URL in to a browser session in my VM and this time, after logging in and giving permission it gave me a secret to paste back into Gcalcli.
Long term usage
If you intend to use Gcalcli the you probably want a config file
~/.gcalclirc mine has
--military

--calendar=NAMEOFCALENDAR

--detail_length
where --military shows 24hr time, --calendar=NAMEOFCALENDAR set the calendar to my NAMEOFCALENDAR and --detail_length shows the number of hours or days an event is, otherwise it just shows the start date/time.
Now when I run one of the following
gcalcli agenda

gcalcli calw

gcalcli calm
it automatically uses the correct calendar, in 24hr with the duration showing. agenda is next 5 days, calw is current week and calm is current month.
Actually use the thing
Easiest way of adding an appointment is to cheat and use --prompt then any parameters you have missed will be prompted, except the duration, which defaults to hours. Specify --allday gcalcli add --prompt --title 'work late' --description 'working late.' Location: work
When: 2016/12/09 16:30
Duration (mins): 60
Enter a valid reminder or '.' to end: .
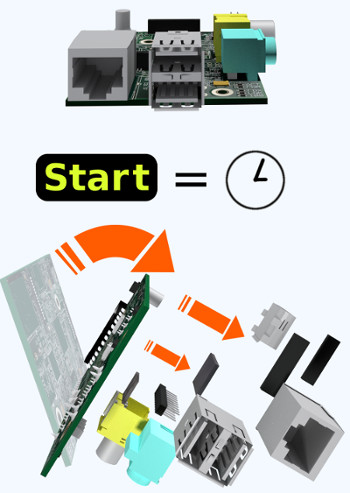
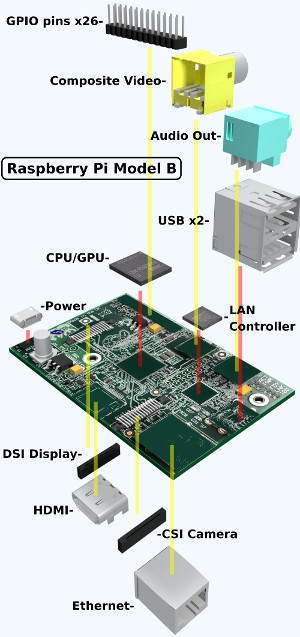
Here a couple of the posters I made to go in VR to replace the corporate ones in my Raspberry Pi Model B game.
This one tells you that you start with a complete Pi and the initiating the Start button a timer will start and the Pi will flip loosing all the components.
Where as this one shows where each component goes. The Game will highlight the correct location as well.
Really hope to have a video to show this working soon.
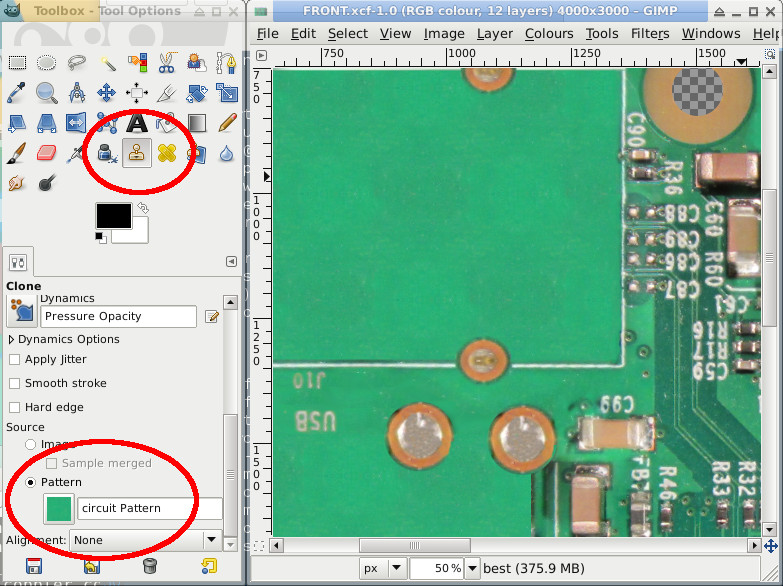
Spent ages looking for how to use this tool mainly because I was convinced that it was called area paint.
It is very clever, select where you want o paint from with the CTRL key and then draw where you want to paint over with the "paint" under the original cursor.
The best way to think about it is a chess set with a few pieces on it. You get the brush size to be about a full chess square and click on the left best square (while holding CTRL) where there are no pieces to your right. Now you draw from left to right over the the row where the pieces are. The brush will draw all the empty squares over the pieces. That analogy is bit flawed, as getting everything to line up perfectly would be a pain but you get the idea.
What I did was copy a section of bare circuit board and the used the Clone tool to make it bigger. I used the Flip tool to make a tile-able image by copying it three times. Then I saved the file as .pat in my gimp user folder.
~/.gimp-2.8/patterns/circuit\ plain.pat
Then as in the screen shot above I selected it as a Pattern (it has a refresh button so you do not have to reload GIMP and now I can paint anywhere in any direction and get "circuit board". Worked very well and something else I had never used properly before.
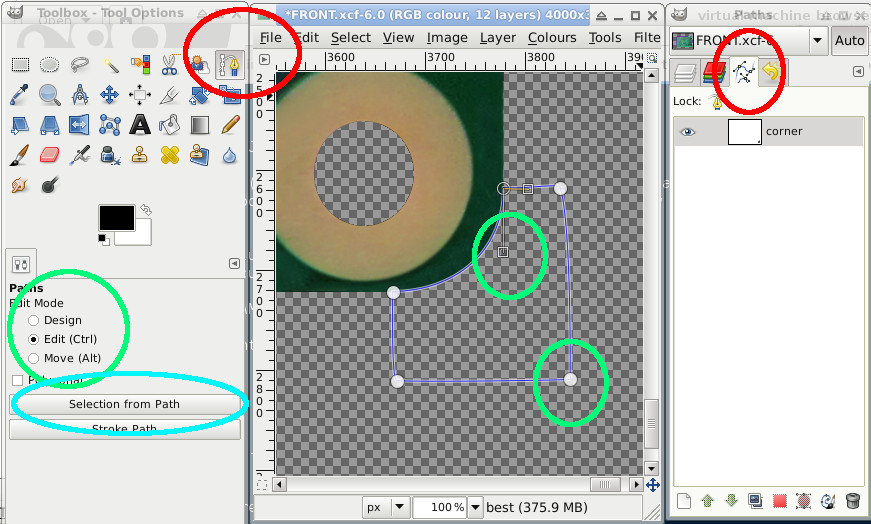
The corners of the Raspberry Pi 3 are rounded and I need to trim my image. I tried various techniques to select the right piece of the corner but I never get it quite right. I needed a true mathematical curve.
Enter Paths. The Path tool and the Path panel are highlighted in red here.
The green highlights show how the tool works. Select Design to add or move individual points. Edit to change the curve parameters, length and direction. Move allows you to move the entire curve as single unit.
I drew curve defining the Raspberry Pi corner and then added a cutting mask. The final path looks like a fat shoe.
Now I could convert my Path into a Selection and use that selection to remove any part of the image that was not Raspberry Pi
Paths are something I have never tried before. I will not be neglecting them again.
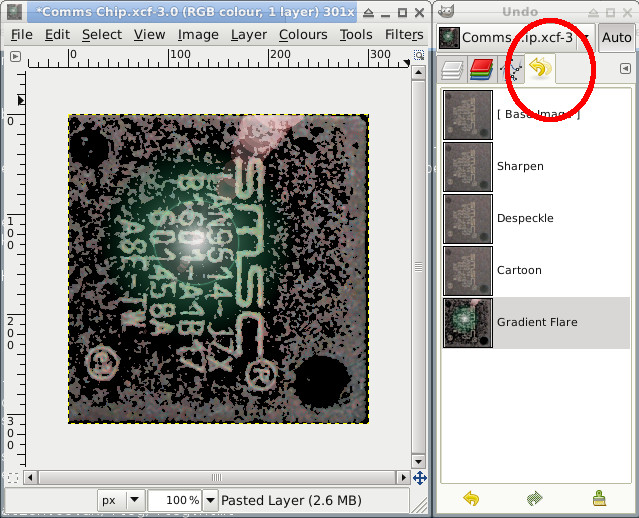
I have used the keyboard short cuts CTRL + z(undo) and CTRL + y(redo) for many years and for basic errors it works very well. But when you are trying multiple steps to achieve a result it can be a pain.
What I did not realise is that GIMP has this separate History panel that shows the visible changes that the different actions created. Best of all you can click to switch to between any of them!
Here I was just applying filters to see how they affected the result. During the Pi project I used them to see subtle differences to compare results of varied sharpening, contrast and despeckle actions.
So it must have been easy getting that shot of the raspberry pi with all the components removed?
NO!
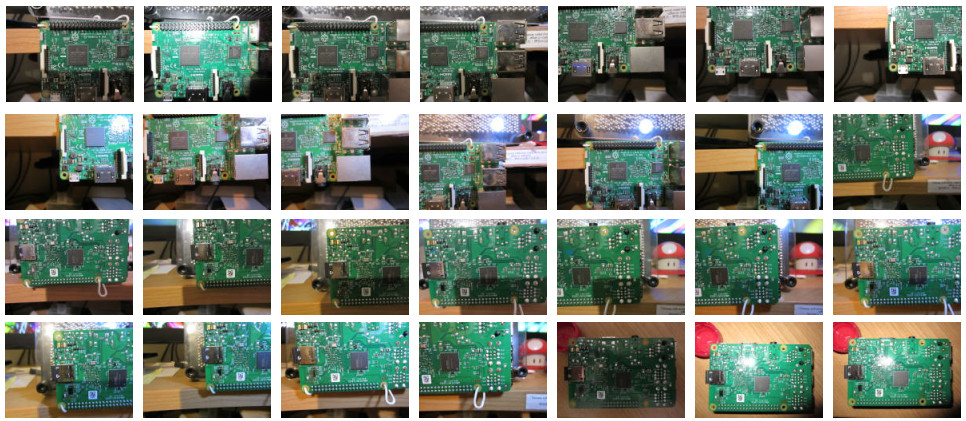
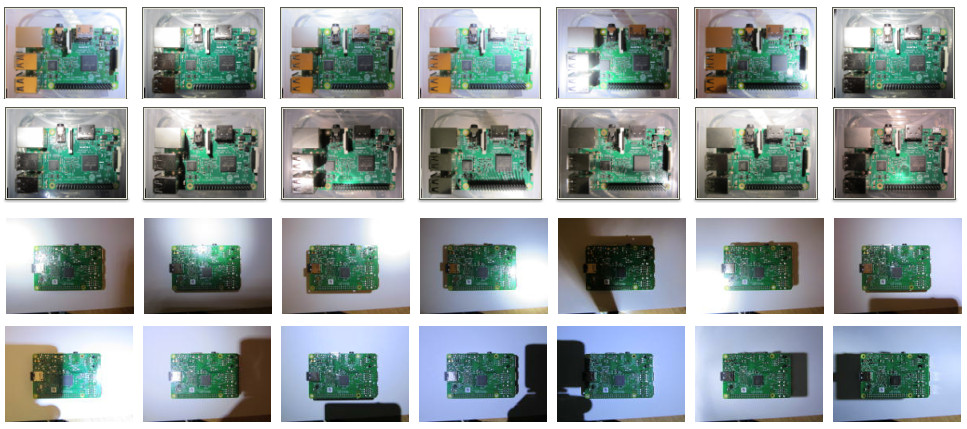
I knew I needed to get a really detailed image so I tried a number of things.
First off I set the camera up in front of the Pi and took pictures of each corner.
Although I could use the perspective and rotation tools in GIMP to get the images to line up, it was not perfect and it was a lot of hard work. So I tried something else.
I keep the camera and the Raspberry Pi completely still but varied the light. Which was just a LED torch.
This was not 100% successful but at least all the different images lined up in GIMP With the various exposures, some with flash, some with the torch pointed directly at different areas, I managed to get a amalgamation that allowed me to construct the base image.
The big problem with this technique is the shadows. If I set the light source to come from the left then the shadows all cover items on the right and vice versa. But also the perspective hides some parts of the board completely, especially from the larger components. I had to spend quite sometime mixing different parts of different layers to mostly remove all the shadows and reveal the hidden parts.
I will write a separate set to posts detailing GIMP tricks I learned.
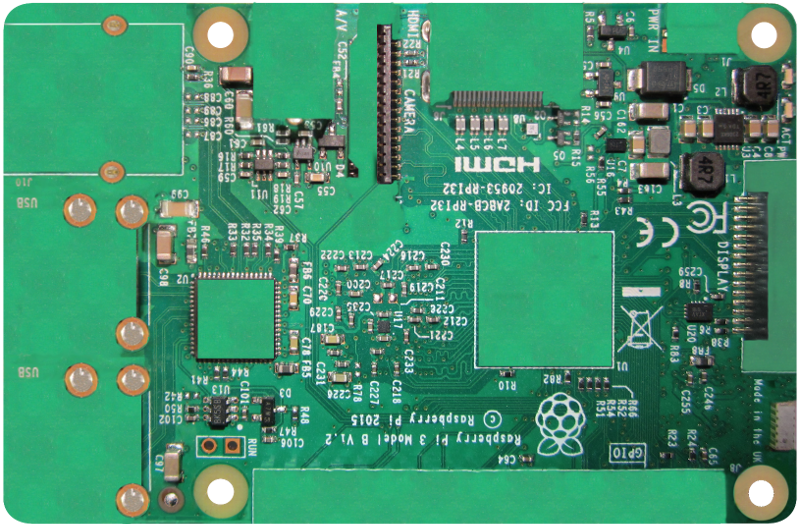
I am about to be pulled off the Raspberry Pi 3 VR project for various reasons but I wanted to document how far I have got.
Here is a 1/4 scaled copy of the top of the Raspberry Pi 3 with all the components that will be modelled in 3D removed. It has to be a high resolution image or it does not look realistic in VR.
Something strange happened last month and I have been trying to get to a point where I can share it here. Unfortunately I keep getting distracted by trying to make something better to present. As this is taking sometime I finally realised I need to blog something before it is all dust in the wind.
So, we were invited to present some Virtual Reality demos at the grand opening of the IET London Savoy Place building in London, literally next to the famous Savoy hotel. The person opening the building was none other than Princess Anne and security was tight. We were not allowed to talk about the appointment before the event.
I was tasked with working up a commercial building 3D file that could be walked around in VR with the HTC Vive. I had one month to do this. Which would have been fine except the file did not arrive until two days before the presentation and it was the same day we were going on holiday. So each night after the kids I had gone to bed while on holiday I would setup the Vive and work furiously to get the demo ready.
We had always planned on getting up early on the day of the demo and leave the holiday, come home, get dressed, drive to London, do the presentation, go home, get changed, go back to holiday. But it was a real pain getting up at 5am.
Back when all this was proposed I was interested in getting a 3D object of a Raspberry Pi I had seen plenty of renderings done with Pi models and the discussions on the Pi boards were "this is done deal, the files are free" except not in a format I could use and not with very good definition. I eventually took models and images from various sources and edited them to my needs. The 3D files had bits that were not on my Pi and I had to rebuild others. The images for the board top and bottom were also not perfect, especially with what I had in mind for them. Eventually I got my model in blender and I started thinking what I needed to do in VR.
Although I had done a building walk-through with the Vive in Unity 3D previously, I wanted to learn more about Unity programming so I set myself a task. Import the Raspberry Pi model from blender with the hi-res imagery and then allow the user to pick up the loose parts.
You can see I got that working in the video I posted previously
While waiting for the building files I was informed that the building opening would also be visited by a number of kids and could I create a VR experience that would appeal to them. I decide that the Raspberry Pi work could become a game.
This is were I pause... the model in the video above is not mine (though I worked on it a lot) and is the older Raspberry Pi Model B. I have been trying to recreate a model of the Raspberry Pi 3 before updating the game and getting rid of the corporate branding before posting this blog post detailing it all. Problem is it is talking a long time. I have taken numerous photos of my Pi and I have not even started on the 3D modelling yet.
Back to the programme. We setup the HTC Vive kit and got the two demos working, the Pi and the house and had my son wear the headset when Her Royal Highness came to our area(myself and my other son were relegated to the other side of the room for security). Although she was unaware, we had hit a slight problem. The VR is great for the wearer but the tiny laptop screen did not make very good viewing for anyone else. The venue had a massive TV and the I spent some time with the AV people trying to get a HDMI splitter to work. It refused and constantly crashed the HTC and the laptop. In the end we copied the above video and one showing a VR user walking around the demo house onto USB and plugged it into the TV so it ran as a sequence of videos.
After HRH left we setup the Pi game and the kids lined up. They loved it. Hit the Start button and the Pi flips over losing all its components, now the users had teleport around and find them and get each one back to the right place on the Pi. There was a 360 image of the street view surrounding the playing area and a huge timer floating in the air. Once all the pieces had been returned the timer stopped and coloured particles fell from the sky. To get people comfortable with the Vive and using the controllers I added some coloured balls you could pick up and throw around. I wanted to encourage the users to throw the Raspberry Pi parts as they would snap into place if they got near where they should be located.
I want to improve on the original. I have already re-done all the branded bits as Raspberry Pi and really just need to find time to setup the Vive and record the video. That is phase One. Then I want to finish the new Pi Model 3, re-do all the graphics, improve the game layout and design and then reveal it to the world. At least offer it to the Raspberry Pi foundation and then possibly to others.
Time, I just need more time. It does not help that I have been quite ill and have had to deal with various family matters.
I was tasked with setting someone up with a Raspberry Pi 3. I had the SD card updated and a old monitor with HDMI converter. It all worked perfectly!
Until I took it to their house and found that the input was not what I expected. It would seem that the top answers on Pi forums and Google for the best input devices for a new Pi owner is not a USB keyboard and mouse but, instead a hybrid mini keyboard with in-built track-pad.
They look very cute and are wireless. It was this last bit that passed me by. I assumed that wireless and compatible with the Raspberry Pi 3 meant Bluetooth. There certainly are plenty of mini Bluetooth keyboards on the market.
This one (Rii I8)(http://www.riitek.com/product/mini.html) was handed to me sans box with only a flimsy instruction booklet. Step one ignore the booklet and spend 30 mins trying to work out why the Pi would not connect to it over Bluetooth(but it would find, not only mine but passers by's phones).
Finally after following numerous How-Tos on connecting with Bluetooth and reading the instructions over and over again we found a YouTube video
https://www.youtube.com/watch?v=alSEocPTqj8
and at the 4:33 mark he opens the battery cover and removes a dongle!
It's not Bluetooth, it's wireless!
Plug in dongle and it immediately starts working with the Pi :D
Although the Rii I8 is cute it is not the most practical thing to use for anything other than light surfing. The track-pad is tiny and this means a lot of repeated swiping to get the mouse cursor across the screen. For my giant hands the keys are just too small, but they do have a satisfying click action.
Disclaimer:
This page is by me for me, if you are not me then please be aware of the following

I am not responsible for anything that works or does not work including files and pages made available at www.jumpstation.co.uk
I am also not responsible for any information(or what you or others do with it) available at www.jumpstation.co.uk

In fact I'm not responsible for anything ever, so there!


![[Pay4Foss banner long]](http://pay4foss.org/pay4foss_bar.png)