f-log

just another web log

31 Mar 2017:
MOAR Blender listed targets part 1
With the two minute tentacle and Xmas 2016 Blender projects complete I can finally get back to my Raspberry Pi 3 detailed model.

Previously I had the HiRes Textures now I need to make all the components.

Reverse Side:
[ ]Solder blob large
[ ]Solder blob small
[ ]Solder blob small flat
[ ]Chip x1
[ ]SD card slot

Top Side:
list coming soon

question is, can I get this done before a new Pi is released ;)
28 Mar 2017:
Video of the two minute tenacle
The Blender Two Minute Tentacle

27 Mar 2017:
stretching the two minute tentacle
So, was the Two Minute Tentacle too quick for you?

Have no fear! Lets break it down a bit.

First of all, unlike 99% of tutorials
KEEP the default cube

TAB to Edit mode
'w' select subdivide - set number of Cuts to 2
Set the selection mode to Faces
CTRL + NUM 7 - switch to bottom view
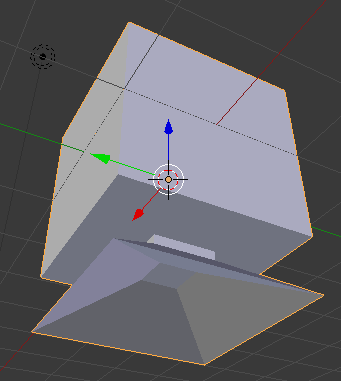
select the center face
'z' to set view mode to wire-frame, so we can see the next bit clearly
NUM 1 - switch to front view
'e' ".1" [ENTER] - extrude a new section and move it .1 in the z axis
'e' ".5" [ENTER] - extrude a new section and move it .5 in the z axis
's' "3" [ENTER] - now scale the new section x3 it's original size
'e' [ENTER] - another extrusion, but just let it stay where it is, we move it in a moment
's' ".2" [ENTER] - scale the extrusion down
'g' 'z' ".4" [ENTER] - move(grab), set Z axis and move it .4 up

screen shot of 3d software blender showing a extrusion that will become a tentacle sucker

'z' - switch the view mode back to solid
NUM 5 - set view to ortho, no perspective
NUM 1 - switch to front view
set face selection to through
'a' unselect everything
'b' select the center column of faces via the mouse bounding box
this also selects the top faces and the back faces.
used to have lots of steps, switching views doing each side separately
's' 'x' "2.5" [ENTER] scale on the X axis 2.5
This stops the tentacle segments becoming spheres, will make sense later

TAB out of Edit mode to Object mode
set Shading Smooth

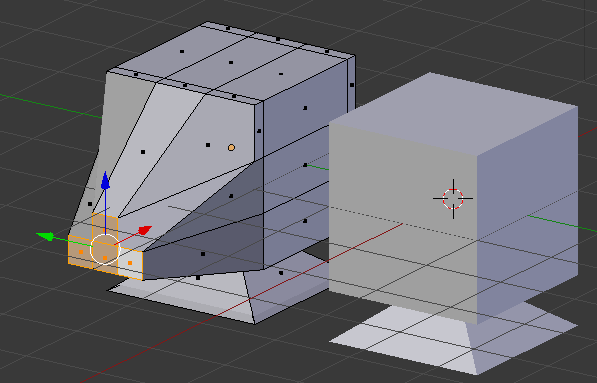
SHIFT + 'd' 'y' "3 " [ENTER] duplicate the cube and move it 3 on the Y axis
TAB to Edit mode
NUM 3 - switch to side view
turn off face selection through mode
Select 9 squares facing and 'delete' "Faces"
CTRL + NUM 3 - switch to reverse side view
Select the bottom three faces and the center face
NUM 7 - switch to top view
'g' 'x' "-1.5" [ENTER] grab the selected faces and on the X axis move -1.5
's' ".5" [ENTER] scale them to half their size
TAB out of Edit mode to Object mode

screen shot of 3d software blender showing a modelled low poly tentacle tip next to a tentacle segment

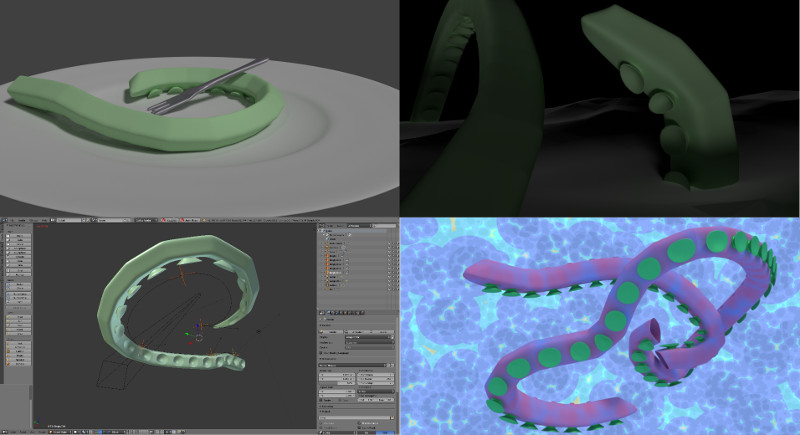
[SPACE] "Add Bezier (Curve)" [ENTER]
's' "8" [ENTER] scale the new curve by x8

Select the original cube
TAB to Edit mode
set face selection to through
NUM 3 - switch to side view
'a' unselect everything
'b' select the faces via the mouse bounding box
'delete' "Faces"
TAB out of Edit mode to Object mode

NUM 5 - set view back to perspective
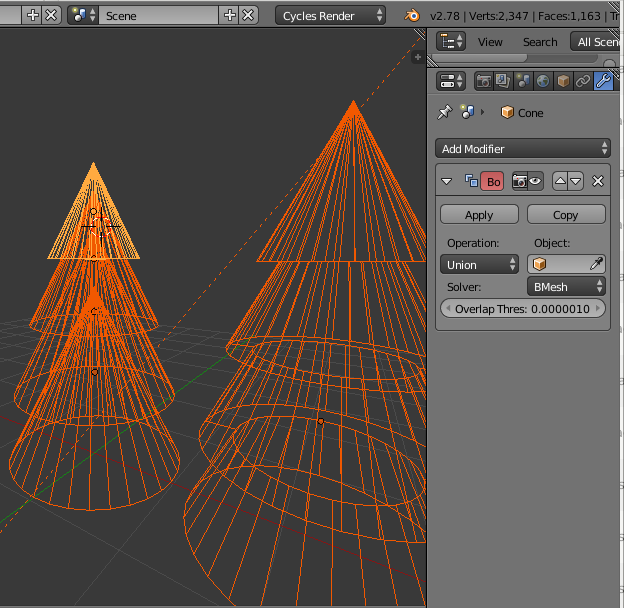
Add Modifier Array
Fit Type: Fit Curve
Set Curve to be "BezierCurve"
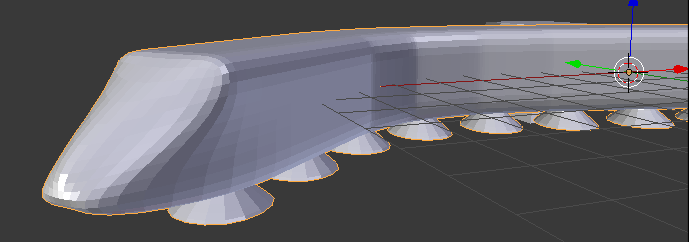
Set Start Cap to "Cube.001"
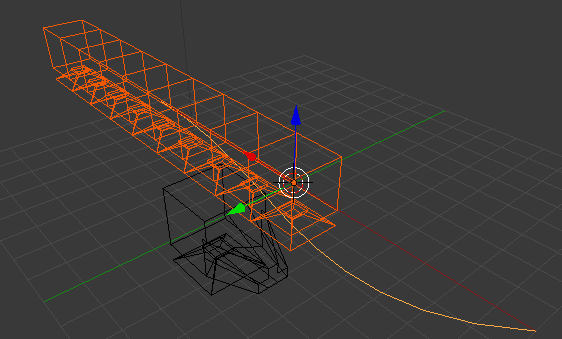
screen shot of 3d software blender showing tentacle segment with array modifier

Add Modifier Curve
Object to "BezierCurve"

screen shot of 3d software blender showing tentacle segment with array and curve modifiers

Add Modifier Subdivision surface
Set View and Render to 3

And .. the square suckers turn into round ones!

screen shot of 3d software blender showing tentacle segment with array, curve and subdivision modifiers highlighting how the square sucker is now round

Select the "Cube.001" Object
'm' "2" [ENTER] moves it to layer 2

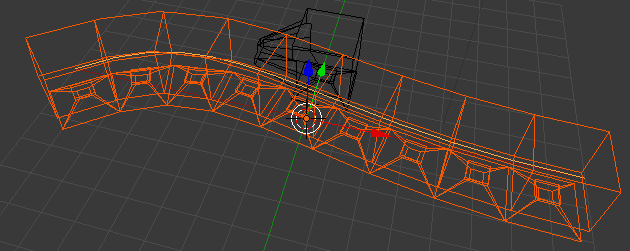
Select BezierCurve(easiest to find it in the Scene list)
TAB to Edit mode
Select either end
Move the view around with the Middle mouse button held down
CTRL + click to create new segments of the curve

Any changes you make to the initial Cube mesh, like narrowing the top, must be done to the Cube.001 object in exactly the same way or the pieces will not match up.
If you do edit the Cube.001 object make sure to hide and then show the modifiers to see any of your changes reflected.

For the animation at the end I found a cool technique of adding Empties as handles that can then be animated. In edit mode for the curve select a vertex and create an empty as hook via CTRL + H, do this for each vertex you want to control. Before all that, I applied the Array modifier to stop the array lengthening as the curve changed.

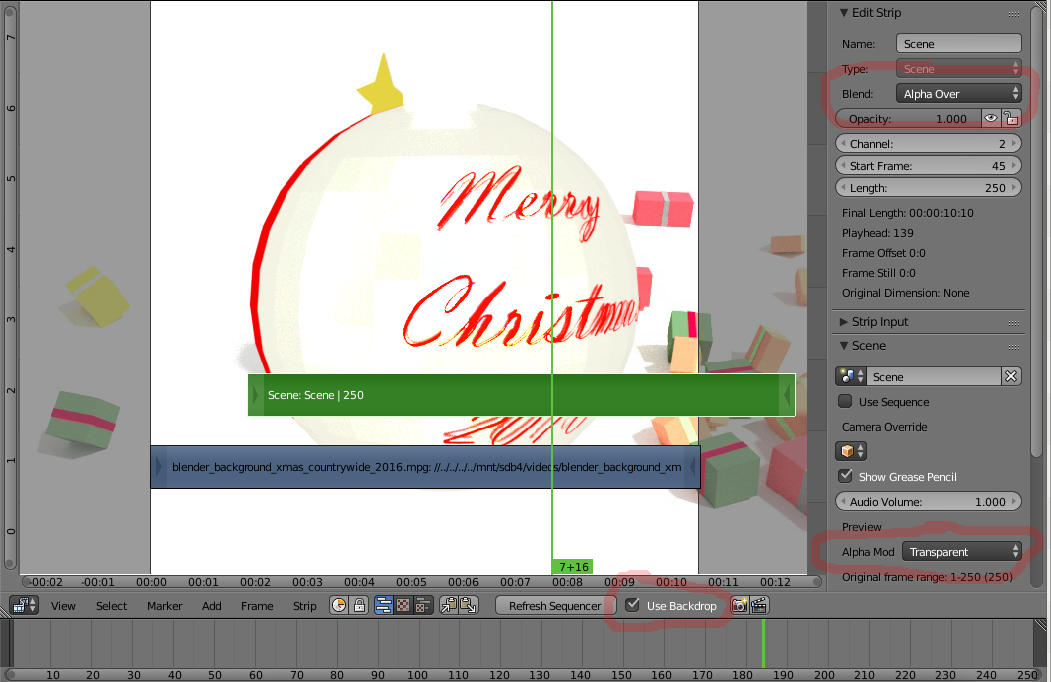
Finally, to create the split screen quad view at the end of the video. Use the Blender video sequencer and add all your images and videos on different channels and then add a Transform effect. Set the blend to Over Drop, set the X and Y scaling to 0.5 and set the position to where you want each to sit.

collection of 4 images all featuring a 3d modelled tentacle, on a plate with fork, rising from the sea in the dark, animation still and two colourfully intertwined

p.s. The original Screencast keys addon is depreciated and one of the reasons is, it does not collect the events during a modal operation like Grab or Scale. But I found a completely new screencast keys addon that does capture everything. To install, download the zip file, give it nicer name than master.zip and use the blender addon "install from file..." button.

12 Mar 2017:
Puking up in the really blue pixel ocean
Work have sorted me out a new mobile a "really blue"(that is what it says on the box) Google Pixel.

Very nice phone and charges in just 15 minutes! Also came with a dedicated USB C cable and mains adaptor as well as a USB C to micro USB adaptor.

The photo app has PhotoSphere, which is like panorama but full 360. Just like panorama you take a picture then turn the phone and take another, except you are prompted to take pictures above and below you, about 30. The preview when you do this looks terrible, edges mismatch, light differing. But then it magically "processes" the PhotoSphere and PING it is all amazing clear with no mismatched edges and all the colours looking right.
You can then turn the phone and see it update in real-time like VR. It is surprisingly difficult to take a good PhotoSphere, as you keep wanting to move the phone as you rotate it. I found the best solution was to orientate on a light fixture and keep checking the phones location as you turn it.
Need to find out how to get the PhotoSpheres off the phone...

As VR "like" as PhotoSpheres are I also managed to wrangle a Google Cardboard. The Cardboard comes flat packed with no instructions. Rather annoyingly my version is also not the version all the YouTube video explain in excruciating detail how to build!

Once built, the phone has very little to hold it in place and the "switch" is not very responsive. It is just a metal washer and magnet.

The VR experiences are a bit rubbish. Maybe I have been spoilt with the HTC Vive. The graphics are very low poly count and you can not move in 3D space.

That last one made me quite sick after a short while. You see, as the Vive tracks all motion, while the Cardboard only tracks rotation. But as you rotate your head you can not help but also moving your neck and body and the visuals then do not match!

There is a slight difference in price though, 700 for the Vive and 5 for the Cardboard.

I was hoping Google s project Tango would be included with the Pixel. Tango tracks the 3D environment around you to determine where in space the phone is. When it works it will the Vive without the lighthouses.
12 Mar 2017:
bastardised usb cable lets motog live a few more months
Could have sworn I had blogged about a little problem I was having with my mobile. I had certainly consulted with a number of people.

You see my lovely MotoG Android phone was not charging. It was not the battery per say but the charging point. It did not matter how many different cables I tried none would make the connection and start the charging.

I tried jeweller's lenses and a USB microscope, but there was nothing obviously wrong with the port. I used compressed air and cotton bud to try and clean it but, there was never any dirt in the port.

I did find that holding the cable in with brute force did work, so I devised a plan. I could not hold the cable in all night to charge but if I could build something.

photo of badly doctored usb cable with superglue, cable ties and metal brackets

So for the last few months that is what I strap my phone into each night.

Over night charging! What a joke, everything is 15min charge now.
09 Mar 2017:
a blended sequence of tree balls
So we are finally on the last Christmas 2016 tutorial, Video Composite.

Blender has a truly amazing video editor and for the longest time I had no idea it was there!

Blender 3D software screenshot showing video sequence editor

So I had created a nice video of a Christmas tree with falling presents and a separate video or a bauble wishing everyone happy holidays. But how to combine them?

I knew it must be possible and first attempt was to re-render the bauble sequence to alpha PNGs. It worked but was a right pain. So second time around when I wanted to render in higher resolution I tried to be a bit cleverer.

This time instead of combining two individual videos I set one track to be the Blender Scene. Worked a treat, set the bauble scene as the top most layer and set Blend to Alpha Over and the Alpha Mod to Transparent. Blender then happily rendered the scene frame by frame over the video!

Finally I checked Use Backdrop to see the frames in the track editor. There was a bit of fun when scrubbing through the video in the editor in that Blender and render the frame before I could see it.

Speaking of re-rendering, when I re-rendered the main tree scene in 1920x1080 it took 23 minutes less than 24 hours!

Original Xmas 2016 Video


Now prepare for the high-speed Tentacle, coming soon
09 Mar 2017:
raining blended presents in hull
One more Christmas 2016 tutorial, Presents.

I had not done much with the Physics tab so this was a bit of a roller coaster.

Blender 3D software screenshot showing animated presents and physics settings

First up, the presents are incredibly simple. Just four differently scaled cubes with a plane extruded around them. Just the same, at first glance they do look like Christmas presents. The ribbons are Parented to the cubes so they do not detach when falling.

I manually duplicated the set of presents and each time rotated the selection on the Z axis.

The floor was set as Rigid Body Passive and presents as Rigid Body Box/Convex Hull.

The video shows some presents digging into the floor. I would have liked to resolve this, but, time... In an attempt to mitigate the glitch I thickened the floor and increased the friction.

Also set some to Box and others to Convex Hull, really not sure it made much difference. Same with Collision Margin.

Turned out to be one of those Quality vs Time <shrug>

Only one more to go, Video Composite.

Original Xmas 2016 Video
07 Mar 2017:
shrinkwrapped big blender bauble
Quick Christmas 2016 tutorial, Bauble.

No images for this one. The Bauble is a simple sphere with flat shading. The text is "wrapped" around the sphere using the Shrinkwrap Modifier.

To be fair the Shrinkwrap Modifier did give me a few headaches, so I set it wrap a little, applied it and then added it again. That is why, if you look closely, in the video you see the text is slightly raised off the Bauble's surface.

I tried to do some clever lighting with an array of emitters but the effect is very weak. As I noted before, this was all a rush project.

Then the Presents and finally Video Composite.

Original Xmas 2016 Video
07 Mar 2017:
blender lights up the tree lights randomly
Still more Christmas 2016 tutorials, Tree Light Colours.

Blender 3D software screenshot showing node setup for random colours

So we have our Christmas tree lights but they are all the same colour. Blenders Node system allows us to set and tweak all sorts of properties for materials.

Here we add an Object Info Input Node and use the Random as the in put to a ColorRamp. Where, instead of having nice blended colours we have 4 Constant colours which in turn are the input for an Emission Shader.

This ensures our lights "shine".

The same setup was created for the Tinsel except with a Diffuse BSDF Shader and three colours, grey, green and red.

Next time we will switch to the Bauble.

Original Xmas 2016 Video
07 Mar 2017:
blended christmas tree lights
More in my Christmas 2016 tutorials, Tree Lights.

Blender 3D software screenshot showing emitter system generating a ring of tree light objects

Just like the Tinsel we are using an Emitter Particle System and again we are using circle as the base.

This time I created a very simple bulb shape from a squished sphere with a little extrusion at the top.

Rather than have the bulbs randomly arranged we want them to appear at each Vertice so we set the Emit from: and the Number accordingly.

Make sure the size is correct and that they are visible alive or dead and set the Dupli Object to be my bulb.

No mucking around with orientation, it just uses copies of the bulbs as is.

There will be another in the Series showing how the Tree light got their colours, see you next time.

Original Xmas 2016 Video
05 Mar 2017:
xmas 2016 blendering up a ring of tinsel
Another in my Christmas 2016 tutorials, Tinsel(i.e. not hair).

The Tinsel looks like hair, but it is not. Instead I need to create long flat plane plane and used it a part of an emitter system create on an extruded circle.

Blender 3D software screenshot showing emitter system generating a ring of tinsel

You can see the Plane on the left named tinsel leaf. Emitters are different from Hair in that you must deal with them in time. Here I set the Start and End frames to be 1 along with the Lifetime. This because I want them to instantly exist.

It was important to only let the generated tinsel only be random in rotation, not location. Hence the Rotation Initial Orientation and Velocity/Hair.

Emitters never come out the right size, Size 0.120

Need to tell the Emitter that it should show both Unborn and Dead particles.

Finally that the object for each particle is Object Dupli Object tinsel leaf

See you in part four, the Tree lights (followed by Tree light colours which is the same technique for colouring the tinsel.

Original Xmas 2016 Video
05 Mar 2017:
oops
Oops! forgot to click save and republished the last post under a new name :(
05 Mar 2017:
xmas2016 blending a hairy fur tree
Next in my Christmas 2016 tutorials we have the Tree Fur(i.e. hair).

Hair in Blender can be a bit fickle, with some options wildly changing the appearance and others only very subtly or only in combination of others.

Blender 3D software screenshot showing hair system for furry pine tree

Here I have set a new Particle System to type Hair rather than the default of emitter and set the random Seed to 2. This was just personal preference and some of the other seed values created clumping.

Segments is set from 5 to 2(the minimum) as we do not need any detail. The fur tree spines are straight.

Emission Number is not the total number of hair particles but the parent source number, see later.

Hair length is set to 1 for nice short spines.

Children Simple gives a 100 folder increase of hair particles when rendered and the Display amount can be kept low (e.g. 10) while in the editor.

Random in Children Simple is the amount the particles radiate outwards in random directions, rather than straight.

Continuing down the huge list of options I tried to tweak the Cycles Hair Settings to make the spines more pointy. I am not sure it worked.

See you in part three, the Tinsel.

Original Xmas 2016 Video
05 Mar 2017:
xmas2016 blending tree cones
The first part of my Christmas 2016 tutorials is going to be quite short.

Constructing the tree. Although it may not be all that obvious with all the fur(tutorial to follow), it is made up of simple cones.

This screen shows Blender with four cones in the background and then the same layout of cones joined together. Notice how all the cone point geometry is removed (bar the top one).
Blender 3D software screenshot showing 4 cones separate and 4 cones combined via the Boolean modifier
The cones are joined via the Boolean Modifier set to Union and that's it!

See you in part two, the Fur.

Original Xmas 2016 Video
loading results, please wait loading animateloading animateloading animate
[More tags]
rss feed

email

root

flog archives


Disclaimer: This page is by me for me, if you are not me then please be aware of the following
I am not responsible for anything that works or does not work including files and pages made available at www.jumpstation.co.uk I am also not responsible for any information(or what you or others do with it) available at www.jumpstation.co.uk In fact I'm not responsible for anything ever, so there!

[Pay4Foss banner long]