f-log

just another web log

16 Mar 2020:
behind the youtube video tutorials and normalising volume
A couple of things regarding the two recent YouTube video tutorials.

They were a lot easier to produce than I expected and I feel bad for not exploring doing them in Linux previously.

I already mentioned that, after recompiling my Kernel, the Snowball Blue USB mic just works and that includes in simplescreenrecorder. Which seems like a silly name for an app, but it really just works, defaults are sensible, cannot complain.

The GIMP logo tutorial is less than two minutes long and was done in a single take. The Cursive writing in Blender was a lot longer and I made multiple captures. Twenty in total, but that excludes all the failed takes, of which there were many.

If you know what to look for you can see the mouse pointer skipping around between takes, but on the whole it appears seamless or at least produced cleanly.

The editing was done in Blender s VSE (Video Sequence Editor) and mainly involved trimming out the beginning and end of each take, where I was starting and ending the screen capture. This can be done with keyboard shortcuts in simplescreenrecorder, but I liked seeing exactly what was going on.
I also found it useful, a couple of times, to count myself in after starting a recording. These, along with mistakes and mobile phone buzzes etc needed to be removed via editing.

The audio was very quite and I used the VSE Strip Volume to increase it. This worked well, to a point. After boosting the volume and exporting the GIMP logo tutorial I found the clipped audio sounded very bad. The result was edited in Audacity after separating the audio.
ffmpeg -i YouTubeGimpLogoShortTutorial.mkv -vn -acodec copy audio.wav
and then recombined with
ffmpeg -i YouTubeGimpLogoShortTutorial.mkv -i audio_fixed.wav -c:v copy -map 0:v:0 -map 1:a:0 YouTubeGimpLogoShortTutorial_FixedAudio.mkv

But I am getting ahead of myself. That was after I found a better way to boost the volume.

When you increase the volume in Blender the waveform is uniformly expanded. This works great as long as there are no extra loud sections. These get clipped. Annoyingly the playback works just fine in the Blender VSE and seems to only be an issue when exported and played back.

Originally I spend sometime using Volume Key-frames in Blender VSE to lower the volume when these spikes occurred. There seems to be a weird bug in Blender that continues to show a red clipping error even when you have lowered the volume so it does not clip, at different zoom levels. I realised I needed something a bit more audiophile-y.

There are some scripts that use FFmpeg to find and boost the volume, but the vast majority of articles recommend the Python app ffmpeg-normalize

In Gentoo I needed to
# emerge -av dev-python/pip
$ pip3 --user install ffmpeg-normalize
$ ~/.local/bin/ffmpeg-normalize *.mkv
$ ls normalize


This boosts the volume to its highest possible value without clipping and did an amazing job.
16 Mar 2020:
cursive writing in blender tutorial
A couple of weeks ago Justin at Blender Frenzy was detailing how to make animated borders for Video titles. He used bezier curves and animated the edges to complete a rectangle framing a title.

It got me wondering if I could take the idea and, not only draw cursive strokes, but also animate a pencil to follow along.

Worked quite nicely and I created the following tutorial.


Next post will be a bit around the process of capturing and producing that tutorial.
15 Mar 2020:
testing video creation with a gimp logo tutorial
Here is the result of testing my Snowball Blue USB mic while running simplescreenrecorder in linux

It is not supposed to be anything special and was something I needed quickly at the weekend.


This test means I can work on my Blender video for an interesting technique.
13 Mar 2020:
looping a simple backup with fdisk maths offset of pi
So it is all working, time for a backup, a remote backup while the Pi is running.

ssh pi@192.168.1.38 sudo dd bs=4M if=/dev/mmcblk0 | gzip -c > raspberry_dd_4M.img.gz
(remember to record the block size in the filename!)

Now, any untested backup is not a safe backup. How do we test it?

gunzip raspberry_dd_4M.img.gz
to get the uncompressed image

fdisk -l
Disk raspberry_dd_4M.img: 3.7 GiB, 3947888640 bytes, 7710720 sectors
Units: sectors of 1 * 512 = 512 bytes
Sector size (logical/physical): 512 bytes / 512 bytes
I/O size (minimum/optimal): 512 bytes / 512 bytes
Disklabel type: dos
Disk identifier: 0x738a4d67

Device             Boot Start     End Sectors Size Id Type
raspberry_dd_4M.img1        8192 532479 524288 256M c W95 FAT32 (LBA)
raspberry_dd_4M.img2     532480 7710719 7178240 3.4G 83 Linux


Shows the boot and main partitions.

and, as root

mkdir mntloop1;mount -o ro,loop,offset=$((512*8192)) raspberry_dd_4M.img mntloop1
mounted the FAT32 boot drive to a new folder mntloop1
and
mkdir mntloop2;mount -o ro,loop,offset=$((512*532480)) raspberry_dd_4M.img mntloop2
mount: mntloop2: overlapping loop device exists for raspberry_dd_4M.img.
Oh, cannot have more that one loopback mount point with a single img file.
umount mntloop1

mkdir mntloop2;mount -o ro,loop,offset=$((512*532480)) raspberry_dd_4M.img mntloop2
mount: mntloop2: cannot mount /dev/loop0 read-only.

hmmm

mkdir mntloop2;mount -o loop,offset=$((512*532480)) raspberry_dd_4M.img mntloop2

Removing the ro Read Only option fixes that.

Now I can navigate all the folders and files at the new folder mount point mntloop2.

Did you see the $((512*n)) in those mount commands?
They mark where the partitions are offset in the img file and can be seen in the fdisk -l output under Start

Mission: SUCCESSFUL!
13 Mar 2020:
decoding python3s unicode obsession with dropbox files
The reason it is not uploading photos to Dropbox is a simple Python3-ism around Unicode strings.

Previously when I retrieved the contents of the status.txt from Dropbox and compared the contents "on" to the string "on" they matched. But when using Python3 the contents are not a string "on" but a Unicode byte stream that is not an object match for "on".

Fix was easy, add .decode() to the call to read the file contents.

I also modularised the code so that I could always take one photo and uploaded it when the script starts, making it easy to test all the core functionality.
13 Mar 2020:
reliving the joy of building a python pi camera in a toilet roll
The great thing about DIY with the Raspberry Pi is not only the cost and control to do what you want, but the fun of doing it and getting it to work. The downside is, when it goes wrong you have to fix it :(

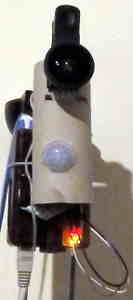
The amazing Toilet roll cam stopped working.
toilet roll cam

It is, after all, just an old Raspberry Pi with a Pi camera and PIR sensor mounted in a toilet roll.

It was online(ethernet), but not allowing ssh connections. Shut it down(pulled the plug) and mounted it locally. Step one complete, will mount on another machine. Step two backup my scripts went smoothly. Even step three gave no errors, fsck just reported dirty bit set.

So ... it was all fine then?

No. Would not boot, LEDs would flash for ages. Connected a HDMI monitor and I can see a Kernel panic reporting file system issues, not good. Time for some more serious fsck-ing.

e2fsck -C0 -p -f -v /dev/sdd2
(where sdd2 is the ext4 partition from my Pi card)
Quite a few things to fix, no errors and running it again after completion found nothing amiss.

Sadly it was the same Kernel panic reinserting the card :(

This Pi is so old it uses full size SD cards and I have a few of those knocking about, so lets set up a new one.

Download the latest image from Raspberry Pi foundation and...
dd bs=4M if=/mnt/sdb1/RaspberryPi/Images/2020-02-13-raspbian-buster-lite.img of=/dev/sdd conv=fsync

Then after mounting the newly written card(both partitions), set the hostname and enable ssh
echo "picam2" >> /mnt/sdd2/etc/hostname
touch /mnt/sdd1/ssh


(as this has no WiFi and is using a networking cable there is no wpa_supplicant.conf file to copy across)

While the card was writing I had a look at the logs my code had been writing. Oh, I think I have found the problem. A massive 2GB log file with details of ever single ping sent. This is only a 4GB card.

Booted up the Pi and ssh'd in. Only IP address worked not picam2.home or picam2.local. More on that in a future flog post.

Enabled the Pi Camera interface via rasp-config

Copied my scripts across from the backup. Always have a backup, or two.

Then I realised that the Python code was all Python2, so a quick clean up to make it Python3. Installed the dependencies and it just worked.

sudo apt install python3-picamera
sudo apt install python3-pip
pip3 install dropbox
pip3 install RPi.GPIO


Expect it didn't and my cool reboot-on-error script kicked in and stopped me ssh'ing back in to fix it :(

Resolved that by re-running the pip3 installs with sudo
sudo pip3 install dropbox
sudo pip3 install RPi.GPIO

Now it is running and Pimote undershelf lighting is working again, but no photos are uploading to Dropbox.

This weird, as all the test showed photos uploading to Dropbox when the PIR was activated.

11 Mar 2020:
smoothing another raspberry pi vr demo over an unsuspecting school
So that went well. We showed off the Raspberry Pi VR demo to another school today.

Younger children, who seemed to be much more engaged and asked lots of questions. Questions about Raspberry Pis, electronics and VR. Unfortunately they also were desperate to know how much the VR setup cost. To let them down gently I kept using the phrase "Professional setup". There are going to be some hassled parents tonight, considering how many of them said "I am going to get this for Birthday/Christmas".

We also had less "lungers" or "runners", but there was certainly enough activity that we had to stay on our toes to avoid any incidents.

With all my improvements, like a restart/reset key and "jump user to start position", things went really smoothly. But I could still see room for improvement.

[ ] Remove the Item count board from the controller when restarting.
Really mad at myself for missing this. When the restart/reset key is pressed everything goes back to its starting state, except the item count board which is attached to one of the controllers. It is a minor thing and nobody mentioned it. It just looks wrong.
[ ] The count-up mechanism does not work very well for these demos.
Would be really cool if we could have a score board with players names and how many items they recovered and how long they took. Could alternatively have a countdown to ensure everyone had the same amount of time in VR. Instead of starting a stopwatch on a phone each time.
[ ] Remove Backface culling on the item meshes.
This works great on the walls when you teleport past them, as you can see through them back to the arena. The USB ports look really odd, almost inside out. Should be a quick fix, just update the Shader.
[ ] Swap which controller has the item count board.
This is a nice-to-have to match players left/right handedness.
[ ] Add sound for items hitting the floor.
Another nice-to-have, to make it really obvious when something is dropped or knocked. Never done sound in Unity before and it would have to be setup to come out of the laptop, as we do not have headphones in the VR demo.
[ ] Update the Teleporter.
Currently using the original basic teleporter from Steam, which operates as a straight laser beam. If you know what you are doing this works great, point the laser at the ground where you want to go and teleport there. Problem is most people do not aim at the floor and end up teleporting from one end of the arena to the other. Most VR games now a days use a parabolic curve, meaning you can only teleport so far as it arches away from you.

None of these things is crucial and I have no idea whether the demo will ever be requested again. Plus I have lots of other projects to complete.

Fishing expedition or a new Blender tutorial anyone?
11 Mar 2020:
taking a big bite out of a four year old raspberry pi
Well the secret mission was updating the Raspberry Pi VR demo. Secret because I was unsure I could edit the code and produce a new build. Last one was 4 years ago.

I specifically stated that if this demo was to get used any more, it need to be revisited and updated.

There was long list of small changes, of which I have completed

[X] Operator(not the user in VR) can change the height of the Pi.
[X] Operator can change the height of the floor, should only be in the case of emergency. Most circumstances will require a re-calibration.
[X] Operator can restart the experience. Previously we shut and reopened the demo for each new user.
[X] Operator can recenter the user. For when they get lost.
[X] Operator can turn on hints.(*)
[ ] Empty space and small hit box on Pi items.(+)
[ ] Items should glow as game progresses.(see Hints(*))
[X] Fix start animation.

Fixing the start animation was the first issue. When the Pi tipped up the components would fall off due to gravity, but then get dragged along the floor when the Pi was tipping back to horizontal. Tracking the movement of their parent, the Pi. This involved removing the components from the Pi parent in the mesh hierarchy and then re-adding them. All the offsets for where their correct positions should be is in relation to the Pi parent.

Keyboard handling in Unity is so simple. In the Update method check if the key was pressed and act on it.

(+) After failing to replicate the issue where object could not be grabbed from their centres, I tried changing hit box sizes. This seemed to go well until I found all sorts of conflicts that totally messed the game up. So just put everything back as it was. If anything falls under the floor, the operator can move the floor :D

(*) I liked the idea of the items glowing more and more as the game progressed, but tests did not go well and I found another option. 3D text in Unity is visible from anywhere, it does not get blocked by other 3D meshes. So I added a text label to each component and set to be inactive(will not be drawn). When a player gets stuck the operator will press "H" and all the labels will active and become visible. Even if the component is behind a another mesh, Pi, wall, etc. the text will be clearly visible.

Unity is an amazing game development platform. You write almost no code, it is all event driven. You just write the one bit of code that is relevant to your specific event.

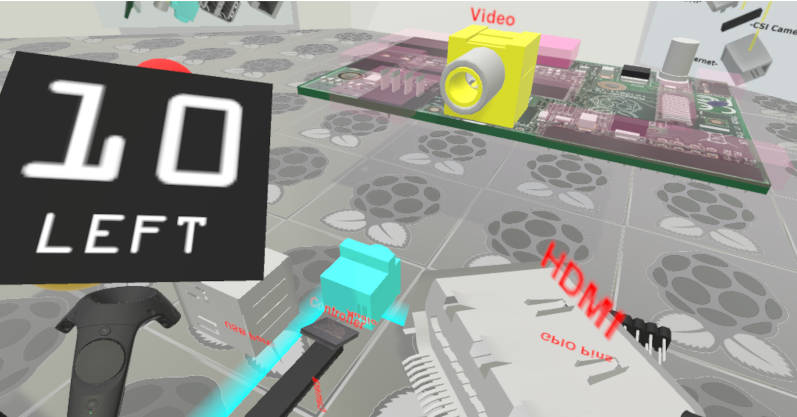
Here is the game running with a single component in the correct place and hints are enabled(the red text labels).
Raspberry Pi VR game with hints enabled
loading results, please wait loading animateloading animateloading animate
[More tags]
rss feed

email

root

flog archives


Disclaimer: This page is by me for me, if you are not me then please be aware of the following
I am not responsible for anything that works or does not work including files and pages made available at www.jumpstation.co.uk I am also not responsible for any information(or what you or others do with it) available at www.jumpstation.co.uk In fact I'm not responsible for anything ever, so there!