f-log

just another web log

30 Nov 2017:
flog fix not very good
Annoyingly the only way to fix a spelling mistake in the last post is to create a new post. Normally I can just wait for a new post of value, but because this is the last day of the month I have to post something before midnight ...
30 Nov 2017:
how many pi components are missing
Raspberry Pi3 Hires
(I am not a perfectionist, because nothing I do is perfect)

I can do better than just talk about the new SD Card slot talk about the new SD Card slot Here is the original image
rendering of modelled raspberry pi circuit board close up on SD card slot
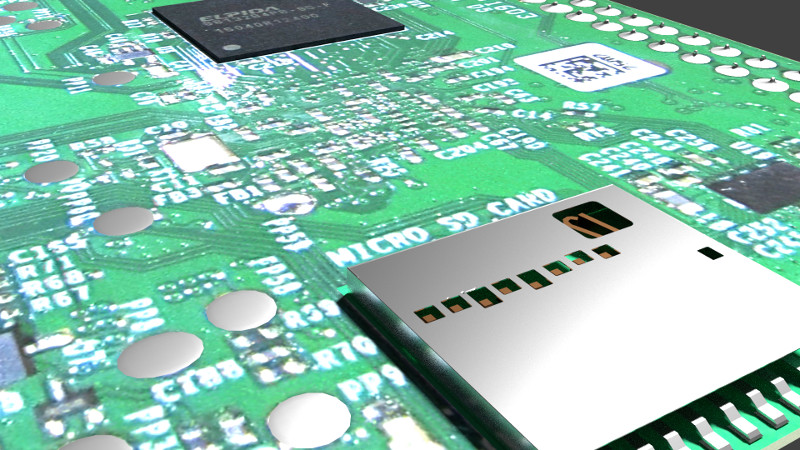
and the new one, with bit of DOF, for effect.
reworked sd card slot 3d model on a raspberry pi circuit board rendered in blender

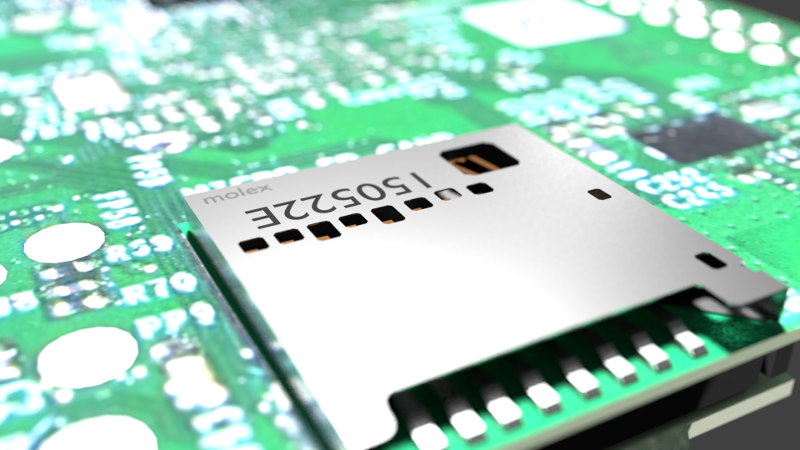
You can see everything has nice curves and none of the nasty edges, where the bad geometry was. The text is far too clean compared to the real one but there are limits.

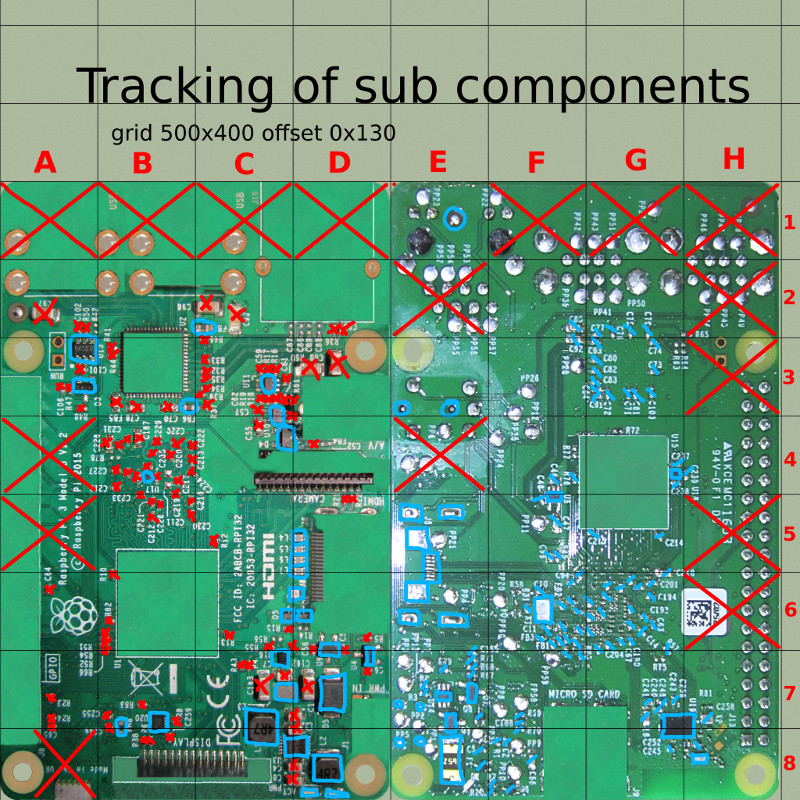
Speaking of which this is the current state of the components. Each square with a Red cross through it is done and dusted. The little Red crosses are components that are modelled and in place. Each of these need to be painted out of the texture, or they bleed out of their 3D counter parts. The Blue bits are components I have not yet modelled.

As you can see there are a fair few to do on the underside of the Pi. There is a whole class of teeny tiny capacitors and resistors that I have not marked because they are so small.
texture map for raspberry pi 3D model augmented with grid and work markers

29 Nov 2017:
knifing an sd slot for cleanliness
Raspberry Pi3 Hires
(I am not a perfectionist, because nothing I do is perfect)

So I revisited the over worked SD Slot and spent about and hour trying to fix the geometry to no affect, reverted twice.

Then I gave up and decided to recreate it from scratch. This time I used no booleans and used the Knife tool to cut everything. Bevelling was done on an individual vertex level.

The results are almost too clean, but I can live with that and I have added some tiny text as per the real life SD Slot.

The component identification as located a HUGE number of items on the reverse of the board. The top was pretty much done apart from 20 minor components. On top of that, the raw image will need cleaning.
27 Nov 2017:
teeny tiny peices of pi
Raspberry Pi3 Hires
(I am not a perfectionist, because nothing I do is perfect)

[X]Board in Blender
-[X]Measure board
-[X]Model
-[X]Texture
-[X]Main components on the bottom
--[X]Chip
--[X]SD slot
--[X]Model Solder types
---[X]Add Solder types
--[X]Plastic through clip x2
--[ ]Micro components, like capacitors (loads of these)
-[X]Main components on the top
--[X]GPIO pins
--[X]Camera connector
--[X]Display connector (identical to the camera connector)
--[X]Broadcom chip
--[X]Other chip (networking and USB, I think)
--[X]USB power connector
--[X]HDMI connector
--[X]Headphone jack
--[X]Ethernet connector
--[X]USB connector pair x2 (making four)
--[ ]Micro components, like capacitors (loads of these)

Started on the sub components for the top side of the Pi.
The Capacitors and Resistors share a common ancestry. A single stretch Cube with loop cuts at the ends and a shiny material for the ends and a yellow center for the capacitors and dark grey center for the resistors.

I noticed the "shiny" ends in real life were often corrupted by solder, so I added a random bump noise.

There are about 100 different capacitors and resistors and this is only the top side of the board!
raspberry pi 3 rendered in blender highlighting the added capacitors and resistors

Also tweaked the main metal texture, but that screwed up my Ethernet decal. So just got better at doing the decal :)
Another thing I noticed in "real life" is that the more I zoom in the more items I see that are not 100% parallel. I think I might get some randomness in before the end.
25 Nov 2017:
super rainbow wave cloud blender composition madness
Blender Just let me get on with my Raspberry Pi project.

But no, it keeps on teasing me with other things to play with

Here we have, not only a video but a tutorial with voice over. Not my voice, I used espeak to do the work.


https://youtu.be/DfXLSPeYGkU

I could not find a way of adding pauses or delays in the input to espeak (without make everything phonetic), so there are some strange ramblings just to get to the next bit.

It is comprised of the composition animation, setting up the mesh and animating the wave, defining the three materials, a review of the video sequence file and then the cloud animation, toon animation and the ribbon animation.

This was the first time I used VSE in anger and learned about Meta Strips. Which are just grouped normal strips, but make life some much easier!

The first animation of the Cloud at 1920x1080 and 1000 frames took almost exactly 48 hours. Then the Toon animation took 10 hours and finally the ribbon animation took another 24 hours(almost to the dot).

I felt with that sort of investment I should try and make something from it.

Learned a lot from putting the whole thing together :)

Here is the transcript, as passed to espeak;


After this demonstration I will explain how the modelling, animation, textures and video editing is all done in blender
There are three textures, the cloud, the toon texture and the wire texture.
The animations were rendered in 4 parts, the cloud taking 48 hours at 19 20 by 10 80.
The toon taking 10 hours at 19 20 by 10 80.
the wire taking 24 hours at 19 20 by 10 80.
and finally the composite taking under half an hour.
Notice how the amplitude of the wave is decreasing until there is no movement.
.
We will start by re-scaling the default cube.
This will form our cloud.
By adding a sub surf modifier the cube is made more and more rounded.
Set both the View and Rendered values to 4.
Apply the modifier and set the mesh smooth.
Now add a Wave modifier.
Set the animation life to 250.
Set the speed to 0 point 0 1.
Set the width to 0 point 2 5.
Finally set the height to 10.
then, add another sub surf modifier to make the result smoother, this one is set to 2.
We can now see the wave.
These wave values were found by trial and error and only match the specific scaling on our default cube.
If you scale the cube with different values, then the wave speed and amplitude will not match.
The animation is uniform, we want it to be animated so that the wave decreases.
At frame 1, hover over the height box and press i to create a key frame.
Then, at frame 200 and 50 set the height value to 0 and press i to create a key frame.
The height value can be seen decreasing to 0 as the animation progesses.
.
Make sure you are in the cycles render engine.
then set up the screen layout with a render view, at the bottom of the screen and a node view at the top.
You will be able to see the render update as the material nodes change.
Create a new material and click, use nodes.
We will start with the default diffuse B S D F material.
Zoom in with the mouse wheel and make space by moving everything to the right.
Add a colour ramp from the converter menu.
Add three new colour points by using the plus sign.
You can manauly move them about so they are evenly spaced out.
Then set each point to be a bright colour.
You can of course use any colours but we are going for a rainbow type effect.
I often want a rainbow colour ramp to clearly show how colours are going to affect objects.
It maybe worth spending time creating an add on or a python script to generate these for me.
Once the colours are specified, connect the colour ramp node to the diffuse B S D F node.
The object will be coloured by the middle colour from the colour ramp.
0 point 5.
We want the value to change based on the textures location on the object.
The default generated coordinates will do.
Add a texture coordinate node from the input menu and connect it.
Now the rainbow effect can be seen on the cloud object.
By adding a gradient texture from the texture menu the we can get a better result.
.
To rotate the texture.
add a mapping node, from the vector menu.
We can control the scale and location from here.
and by manipulating the zed rotation value we can see the texture rotate.
To animate the value.
set the zed value to, minus 90.
then set the frame to 1, and hover over the zed the value, press i to add a key frame.
set the current frame to 200 and 50 change the zed value to 90 degrees and press i to add a key frame.
we can now clearly see the animation interprelating the values between minus 90 and 90.
.
Now let us add the cloud texture.
Add a mix shader from the shader menu.
from the shader menu, connect a volume absorbtion shader node to the top mix shader connector.
from the shader menu, connect a volume scatter node to the bottom mix node connector.
Connect this mix node to the volume connector on the material output node and disconnect the diffuse B S D F shader.
This gives us the cloudy ness.
Connect the colour output from the colour ramp to both the colour inputs of the volume nodes.
The cloud is a bit grey so let us increase the lighting.
Select the lamp click, use nodes.
increase the strength to 500.
select the world icon in the tools and set the colour to black.
by scrubbing through the animation we can see the rainbow texture rotating, on, and with in the, now volumetric, cloud mesh.
how ever, it is still a bit to dark.
there is no ambient light from the background.
we can try changing the lamp strengh to 800.
but purhapse a sun lamp type would work better.
800 is to strong for a sun lamp.
change the value to 10.
that is much better.
.
The toon material is the easiest to create.
Make room in the node layout.
add the toon shader from the shaders menu and using its defaults.
connect colour from the colour ramp to the colour input on the toon shader.
connect the B S D F to the material output surface input.
disconnect the volume.
The toon shader creates some stunning visuals with high contrast shadows and colours.
It produces a vibrant affect with our rainbow cloud wave.
The result looks almost flat as watch the colours move across the animating cloud mesh.
.
to create the wire slash ribbons material we need to mix a colour and transparent source.
add a mix node and connect it to the material output node.
we cannout use the colour ramp output directly so connect the B S D F to the top connector on the mix node.
now add a transparent shader from the shaders menu and connect it to the bottom connector on the mix node.
currently the this will just make a semi transparent material.
add a wave texture from the textures menu.
connect the output from the texture mapping node to the vector input on the wave texture node.
add a new colour ramp from the converter menu and connect the wave node to it.
connect the colour output to the factor on the mix node.
you can already see stripes appearing on the mesh.
by moving the black and white default colour points in the colour ramp node we can define the size of the ribbons.
adding addition colours would have no effect as we are just taking the brightness a value to affect the mix node factor.
this ribbon affect allows us to see through the object as if the gaps between the ribbons where holes in the mesh.
if we review the animation, the colour rotation and wave animations still play nicely with the ribbons in place.
the ribbons as they exist at the moment are a bit fuzzy.
lets fix that now.
the gradient between the black and white points in the colour ramp node is the problem.
by moving the two colour points closer together we reduce this and thus the ribbons become sharper.
.
finally we are going to review the video composition rather than create it from scratch.
this blender session is set to the blender internal renderer.
each video has been loaded into the video editor and has had various effects applied.
these have been grouped into meta strips and collapsed so all you can see are the main sections.
you can expand a meta strip with, tab.
here is the mix of the three rendered material types, with differing transistion wipes applied.
here is the first wipe transition affect.
it is set to a transition type of, double.
this produces the expanding, door affect, revealing the next video.
positioned above the first in the strip layout.
next the transition type is iris, that creates an increasing hole, revealing the next video.
the blur width can be changed to make the transition smooth or sharper.
we then repeat the iris wipe transition, but allow it to reveal the next video below the last.
and finally, another wipe transition type of double.
remember this is all happening with in a meta strip.
tab out of this strip and we will look at the next meta strip.
this meta strip has only one video and one effect.
the effect scales the video to 1 third its original size and translates it to the top left corner.
the final video out put has two of these.
the second one also scales to 1 third the original size, but translates to the top right.
The three meta strips combine to make the final video, with its three source files split, and combined to make the final composition.
The voice over you have been listening to is simply the out put from the linux e speak program saved as wav file and.
you guessed it.
combined within blender.
we will end with the three original video results.


25 Nov 2017:
Wacom comes home to Linux
Wacom is back in business (on my machine). If you remember back in June any use of me 7+ year old Wacom tablet crashed the machine.

It is great to finally have it back again. The Wacom tablets are a joy to use. No batteries or setup, they just work. Gimp and Blender just work even with the pressure sensitivity.

One of the reasons I got into Linux was the backwardly compatible hardware support, this just makes me so happy.

In other news I had another Blender Shiny attack and then felt compelled to create a video about it. Hopefully I will finish that today.
18 Nov 2017:
android pong denied
I had an idea. It was a good idea and at first it worked perfectly. Luckily I decided to test it before putting it into practice.

My PiCam needs to be toggled on and off from DropBox, which is great, but I have to remember to do it. What if the PiCam just enabled every time I left the house?

Every time I leave the house I take my phone with me. So I can just ping the phone on the local wifi once a minute and if it is there I am home, if not activate the PiCam. False positives are acceptable ...

So I just ran
while (true); do date >> ~/temp/pixel.ping; ping -c 1 android-243f580de23000a8.home >> ~/temp/pixel.ping;sleep 1m; done

and left it running for a few days.

Initially it seemed to work fine. But closer inspection showed that only when the phone active or charging was the ping "pongged". If it was just in the house then it did not respond. Of course, I could unlock it or wait for a background application (like the BBC news) to do some networking, but those activities would have to correspond with the ping :(

I could write an app and install it on my phone to send a request to a NodeJS server on the PiCam. Sadly I have no time or patients for that.

Hmmm, I think the next step will be to see if I can create a persistent Bluetooth pair from the PiCam to the phone...
06 Nov 2017:
printers lies and chromebooks
I was helping Sarah out with setting up Chromebooks for new employees. She has a Google Suite account that means that creating new emails and log in details is very easy. All she wanted me to do was make the printer work on them...

So the printer and the Chromebooks are on the same WiFi so it should be easy? NO! Deep in Google s documentation there is the little note that YOU CANNOT SETUP A PRINTER ON A CHROMEBOOK! But, but you can use printers on a Chromebook.

Yep, very confusing. You must make sure another PC/Mac has the printer setup, again, on the same network. Then go into the Chrome browser, log in to Google and then go to chrome://devices and then add the printer.

Now the printer is associated with your Google account and you can "Manage Printers" on any Chrome browser whilst logged in. You can share the printer with others. the G-Suite finds employees. And the Chromebook can finally print!

What it does not state, is that that PC/Mac is now the living breathing print server and if you turn it off OR disconnect it from the network then you CANNOT PRINT!

You would have thought that by now printers would be so generic that a single network printer driver could "drive" any printer, at least for its basic functions!

So at the end of the day the route to getting a printer makes sense. Setup a print server with the dedicated drivers and using your Google account link the access. But the documentation is appalling, it is all over the place. Mainly because the Chromebook documentation just links to the standard Chrome documentation. Not to mention the funny little UI inconsistencies in the Settings pages.

I can not imagine a non-technical person being able to figure any of it out. What if you only had Chromebooks?

Phew! I feel better after that rant.
02 Nov 2017:
joe presents spain in a blender
Here is Joe doing a presentation on Spain. You may notice a small amount of Blender based effects :)


So that was where the star was used.
loading results, please wait loading animateloading animateloading animate
[More tags]
rss feed

email

root

flog archives


Disclaimer: This page is by me for me, if you are not me then please be aware of the following
I am not responsible for anything that works or does not work including files and pages made available at www.jumpstation.co.uk I am also not responsible for any information(or what you or others do with it) available at www.jumpstation.co.uk In fact I'm not responsible for anything ever, so there!

[Pay4Foss banner long]