f-log

just another web log

21 Jan 2019:
black not black enough for true pi
Still not right.

The Ethernet black plastic has too subtle dirt.

USB ports metal looks good now.

Studying the Ethernet port and comparing to the physical device has shown all my "black" plastic is not dark enough.
20 Jan 2019:
dirt runs away with pi render with no power
Yesterday I tried to render the new dirty Pi as an animation, but we had two 0.5 second power cuts. Not the breakers and not just the street, people affected in at least a five mile radius.

In the end, left it rendering over night with 10 frame increments, so only 36 frames total.

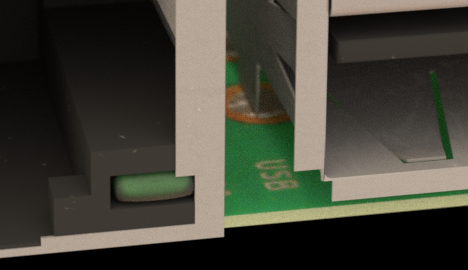
Looks good! Except the insides of Ethernet port and the USB ports.

Rendering of Raspberry Pi showing over zealous use of dirt maps

The flakes that work so well on the CSI connectors black plastic look completely wrong inside the Ethernet port. Although the outside of the USB ports looks good the inside looks bizarre.

Back to the drawing board and at least I did not render 10x the frames before I found this out.
17 Jan 2019:
getting down and dirty with the pi in blender
As previously mentioned everything is to damn clean!

Time to get down and dirty.

After some experimentation I found the best procedural dirt map was via the Noise Node.

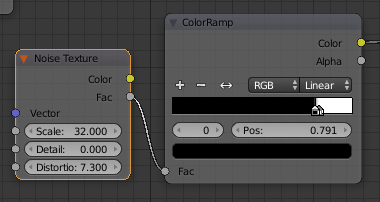
Blender nodes for dirt map creation
Here the Noise Node has a high scale factor 32. This keeps the results nice and small. The Distortion creates non uniform shapes, like scrapes and blobs rather than simple dots. Again, this is quite high 7.3.
This mess get piped into a Color Ramp that restricts the output to a very small window of colour. Otherwise we just end up with noise. This way we end up with a few tiny, odd flakes of white.

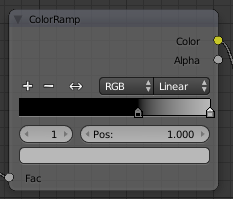
Blender nodes for dirt map creation light variation
Of course you do not always want a stark result. This time the Color Ramp is creating a larger spectrum of allowed values where the strongest is light grey, not white.
This version creates more of a mottled, smudge effect.

I rendered the Ethernet ports with this new double dirt map and could only see the flakes. Denoising was "fixing" all my colour aberrations :)

After "dirtying" almost all the materials in the scene, I still need to work on the circuit board. It has all the previous maps making this a lot more complicated. Found the electronic traces are a bit too jagged, needs some anti-aliasing, but without ruining the height effect!
14 Jan 2019:
python autosmooth port fix worked after all
As per that last post. Tried tweaking the Autosmooth, but every value caused some kind of issue. Time to fix the geometry.

Good thing I had been playing with the code.

import bpy
import bmesh
obj = bpy.context.edit_object
me = obj.data
bm = bmesh.from_edit_mesh(me)
print("=======")
for f in bm.faces:
    if f.select:
        print("")
        for v in f.verts:
            print(v.co.y)
            v.co.y = 2.5824263095855713

Tweaked to affect all Faces that are Selected, I would select a the ring of faces around an inset and it would align each Vertex to the same Y position.

It was worth all the work.
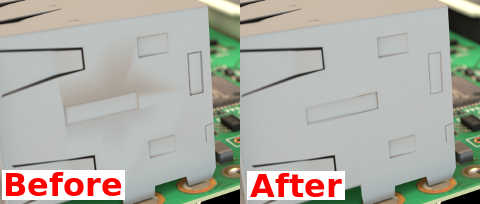
Two renders comparing the ethernet ports with and without vertex manipulation

and you know it is real because the "after" shows the Camera plastic :)

p.s. Obviously I made a similar change to the other side of the port and then deleted the other one and duplicated the new. Working at the close up I also ended up going to town doing lots of tiny geometry fixes.
10 Jan 2019:
my favourite autosmooth value eats shading for lunch
I thought fixing the odd shading on the Ethernet ports was going to be easy or at least straight forward.

NO!

First up I tried removing unnecessary Faces and Edges as I did previously. Improvements were made but not by much and not where I wanted them.

Then I wondered if the Vertices was ever so slightly miss-aligned along the Y axis. Wrote some code, proved my point and ... did not fix the issue.
import bpy
import bmesh
obj = bpy.context.edit_object
me = obj.data
bm = bmesh.from_edit_mesh(me)
print("")
for v in bm.faces.active.verts:
print(v.co.y)
v.co.y = 2.5824263095855713
Then I turned on all the Normal tracer lines and ... hmmm what are they doing pointing there?

On some of the edges of the main faces where the shading issue is there are adjoining faces that are at 25°. Why is this important? Because autosmooth 30° is my magic number.

Anything under 30° is rendered Flat shading and anything over is Smooth shading. So, it is working as I asked it too :(

What to do?
I could change the Autosmooth 30° to 24° but I do not know what impact it might have elsewhere. Or I could change the angle of the adjoining faces. Or I could create an inset, so the transition to the "bad" angle is only on the tiny inset.
10 Jan 2019:
always look for the simple material answer before going all node
So all that fancy testing in the last post was a bit unnecessary...

Turns out I had just managed to assign the Material to those internal faces, DOH!

Still, it was then an easy fix. Pity it took almost an hour to workout why my amazing Node fix was not working!
09 Jan 2019:
not normal backfacing node test works
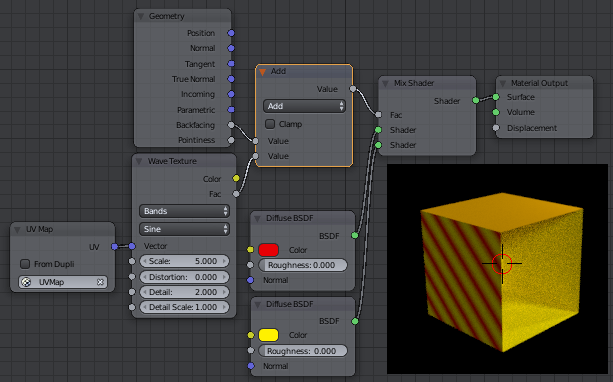
So to fix the Ethernet texture appearing on the inside I created a test.

This is the Default scene/Cube with a single face cut away. The two faces perpendicular to the missing face on the horizontal have been Unwrapped as "UVMap".

The Texture sets up a basic Red and Yellow BSDF controlled by a Wave pattern. The clever bit is also using the Backfacing information to only allow the affect to effect that outside of the Cube. When that is not there the pattern is visible on the inside of the Cube faces.
blender partial screenshot of node layout hiding texture from backfacing faces

I did try using the Normal as the control but did not get good results.
09 Jan 2019:
true render of pi shows the ugly side of hdri
The animation completed rendering for the new and improved Raspberry Pi HiRes Project

and ...

I found some problems during the viewing of the video.

The black plastic on the CSI camera connector had vanished (again), now fixed.
The Ethernet reflective texture is working too well and showing up inside the connector. Never seen that before, but now I am using HDRi lighting.
The USB ports have an odd, though not hugely noticeable, shading issue.
It is all so damn clean! Comparing to the real thing that close up, it seems to teem with dirt and scratches.

The animation did look luscious, barring the above. The gloss and height maps worked perfectly.

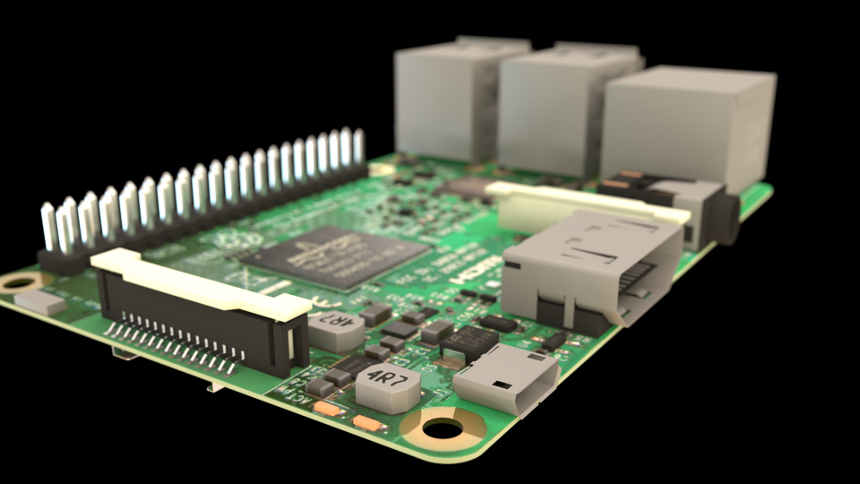
raspberry pi 3b rendered in blender frame 120
01 Jan 2019:
quick frame update
Currently on frame 115 of 359 showing off the new and improved Raspberry Pi HiRes Project

Averaging 1 hour per frame. 1920x1080 with DoF and denoising.
01 Jan 2019:
yearly summary on day one
It is 2019 so here is the 2018 yearly summary review.

Of course the biggest thing was even more Raspberry Pi HiRes Project. Not only was the video and model published, but I also started work on improving it :(


Stats
71 posts (40 tagged as blender
512 different tags
of which 180 were new


find . -mtime -365 | wc -l
find . -atime -365 | wc -l

atime (access time) seems to match creation time on a etx4 filesystem.

2018 yearly summary
archive of all past posts
01 Jan 2019:
mentioned by famous youtubes
Meant to post this last year HA!

I was mentioned in two YouTube videos in the last couple of months. One was complaining about a Blender technique but providing a solution that the author thought was well worth highlighting in his follow up video. The other was for some old VHS tapes that I donated to a reviewer and were mentioned in an unboxing.

I will not toot my own horn, but the Blender one was in one of the many excellent Blender VSE (Video Sequence Editor) videos in the Blender for blogs series at BlenderFrenzy. Will not tell you which one!

When the VHS review comes out I will link to that. Nostalgia Nerd. Lots of good and quite varied stuff.
loading results, please wait loading animateloading animateloading animate
[More tags]
rss feed

email

root

flog archives


Disclaimer: This page is by me for me, if you are not me then please be aware of the following
I am not responsible for anything that works or does not work including files and pages made available at www.jumpstation.co.uk I am also not responsible for any information(or what you or others do with it) available at www.jumpstation.co.uk In fact I'm not responsible for anything ever, so there!